Besides RDP and SSH connections, you can tunnel any connections of your choice using an ISL Light session. The custom tunnel functionality can be used once you establish an ISL Light session with the remote computer from within the session view. Please follow the steps below to see how to create a custom tunnel to the remote computer.
NOTE: Custom tunnels are not supported in ISL Light Desk and ISL Light Client (v3)
Step 1
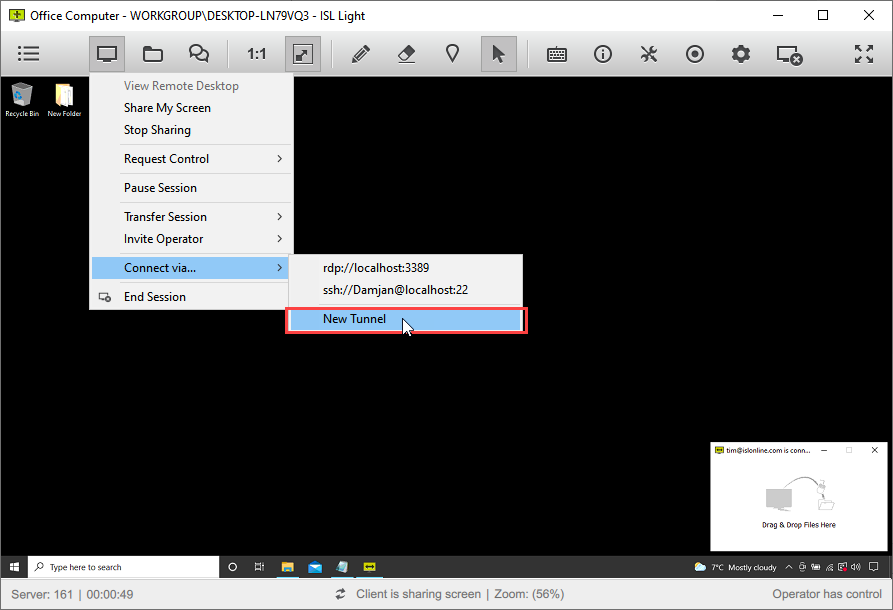
Click on "Connect via..." and "New Tunnel" once connected to the remote computer.
Step 2
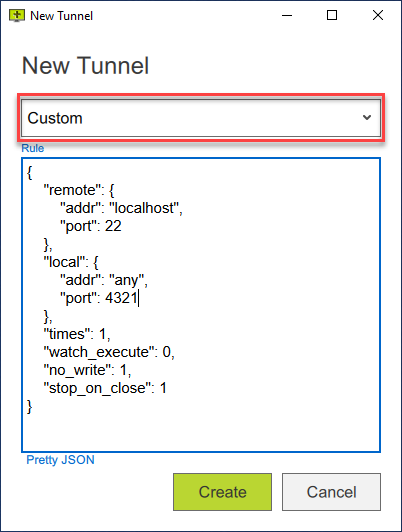
Select the "Custom" option and type in the custom tunnel Rule. The rule above will bind the port 4321 on your local computer to port 22 on the remote computer.
Rules are divided into the following categories:
-
remote
- addr - IP address to which the remote computer should connect. You can enter "localhost" in that case the connection will be made to the remote computer itself. Or you can enter an IP address of another computer in the same local network as the remote computer.
- port - Port on the remote computer to which the tunnel should connect.
-
local
- addr - [any|localhost] - Address from which you local computer will accept connections. If you enter "localhost" then you can only use the tunnel from your local computer. If you enter "any" then any computer on the same network as your local computer will be able to use the tunnel.
- port - Port on the local computer to which you will bind the tunnel
-
additional
- times [n-number] - How many connections the tunnel will accept. Once the set number of connections is made the tunnel will stop listening for new connections.
- no_write [1-true|0-false] - Do not save the tunnel properties. This means that ISL Light will not remember the tunnel and you will have to specify it again next time.
-
stop_on_close [1-true|0-false] - Close the ISL Light session once the tunnel is closed.
- Tunnel is considered closed when it is no longer listening for new connections (e.g. times parameter is specified) and there are no active connections going trough the tunnel.
-
watch_execute [1 -true|0-false] - Used in combination with the execute parameter. Close the ISL Light session once the execute command is executed.
- Note: Execute parameter is used to bind a service on the remote computer to the tunnel port. Example of the execute command is shown when creating a RDP or SSH tunnel as seen here. You can bind a custom service in the same way.
Example configuration:
{
"remote": {
"addr": "localhost",
"port": 22
},
"local": {
"addr": "any",
"port": 4321
},
"times": 1,
"watch_execute": 0,
"no_write": 1,
"stop_on_close": 1
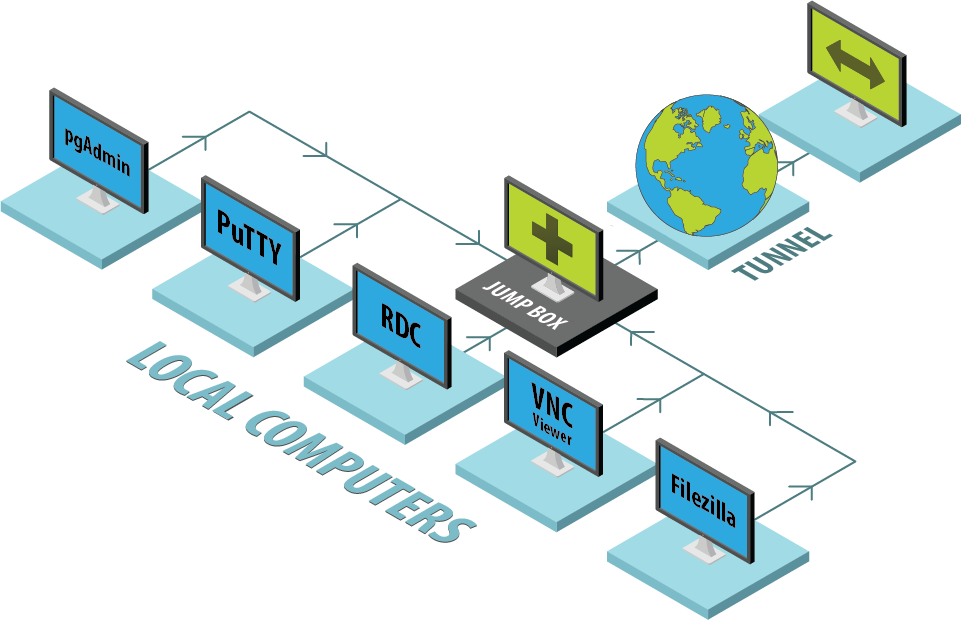
}The configuration above binds port 4321 on your local machine to port 22 on the remote machine. Your local machine will accept connection from anywhere ("addr": any) and tunnel them to the port 22 on the remote computer. Please take a look at the diagram below showing the network configuration. In this example it is your computer that is serving as a "jumpbox" and all of the local computers can use the tunnel, since you set the addr parameter to any.
Step 3

Any connection to your local computer on bound port (in our example 4321) is tunneled to the bound port on the remote computer (in our case 22). This means we can make an SSH connection to your local computer on port 4321 and it will be tunneled to the remote device.
Important: You can use the tunnel from your local computer by accessing it at localhost address or you can access the tunnel from any other machine in your local network by specifying the IP address of your local computer. In the later case your local computer will serve as a jumpbox allowing any computer in your local network to connect to the remote computer.
Note: Please refer to one of the following examples : Connect to the remote computer via VNC (Example) or Remote Printing via Custom Tunnel (Example), to see how a custom tunnel can be used in practice.
Step 4

You are now connected to the remote computer by establishing an SSH connection on port 4321 on your computer.
Related Articles:
Set RDP/SSH as Default Connection
Remote Printing via Custom Tunnel (Example)