In this example we will be using two different computers A (your computer) and B (computer at your place of work) and a network printer P (at your place of work). Computer B and printer P are located in the same network, however your computer is in another network altogether (you are on a business trip, working from home...). We will show how to use a tunnel to computer B to remotely print something from your computer on the printer P.
Summary of procedure: You will configure the printer properties on your computer in such a way that a print job will be sent to the localhost address to port 9100 (user chosen port). Port 9100 on your computer is tunnelled to computer B via ISL Light session and computer B forwards the print job to the remote printer inside its network.
Note: For this example to work, computer B doesn't need any knowledge about printer P or any printing drivers whatsoever as computer B will only serve as a jumbox for the connection.
Step 1 (Computer A)

Obtain and open printer Properties for the remote printer you will print on (you can access the printers under Control Panel by opening Hardware and Internet section).
Note: If you ever printed on the remote printer before the Properties will most likely be saved on your computer already, otherwise you can download and install the correct printer driver for your printer from manufacturer's website.
Step 2
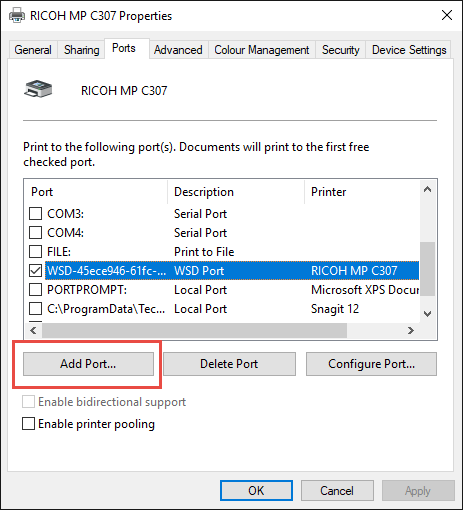
Open the "Ports" tab and click on "Add Port...".
Step 3
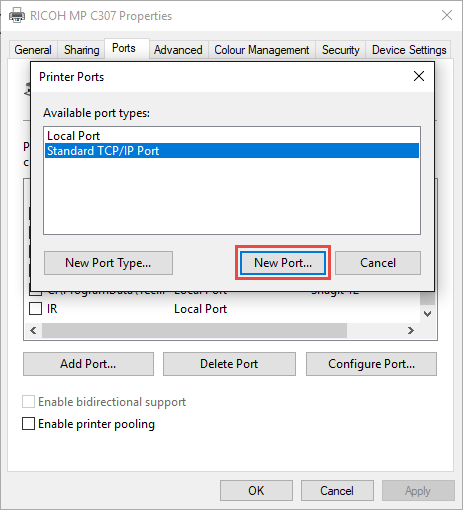
Select "Standard TCP/IP Port" and click "New Port..."
Note: In this and the following steps you will configure the port and address on which the print jobs intended for specified printer will be sent.
Step 4
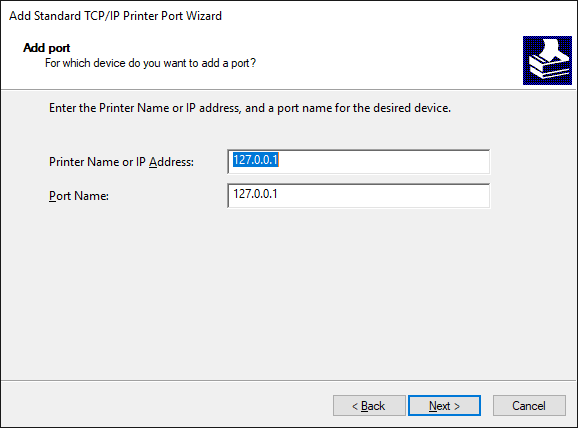
Enter 127.0.0.1 as the printer's IP address.
Step 5 (Optional)
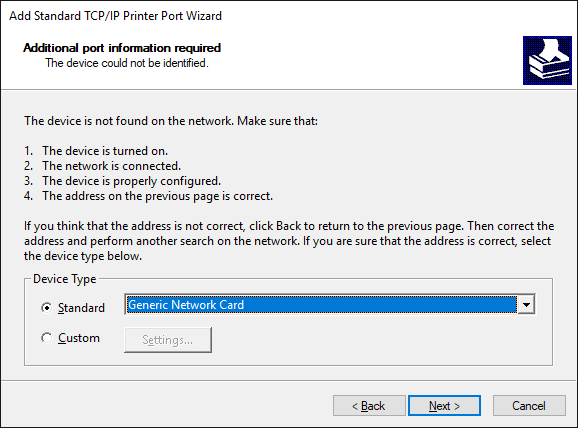
If you configure Printer properties before creating a tunnel Windows will notify you that it can not find the printer at the specified address. Click "Next" to proceed and create the port anyway.
Step 6
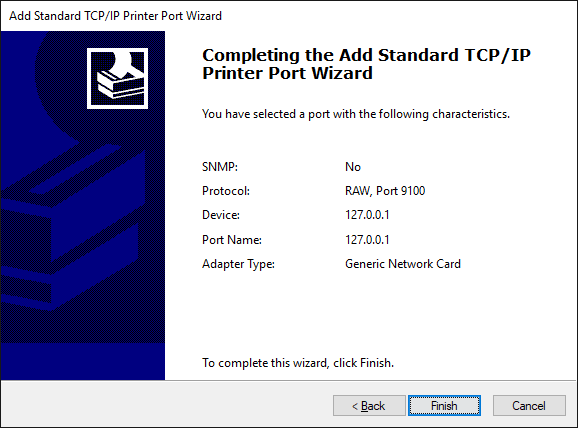
Check that configured settings are correct then click "Finish" to create the port.
Step 7
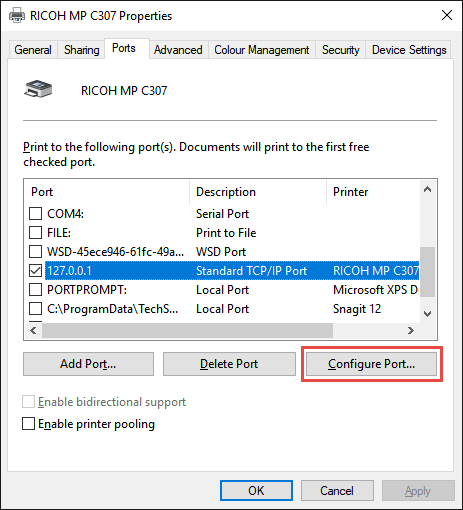
Select the newly port in the Printer properties and click on "Configure Port..."
Important: Tick the checkbox next to the newly created port to begin using it. Keep in mind that you will have to change the port back to the previous value when you wish to print normally again (e.g. when you return to your office).
Step 8
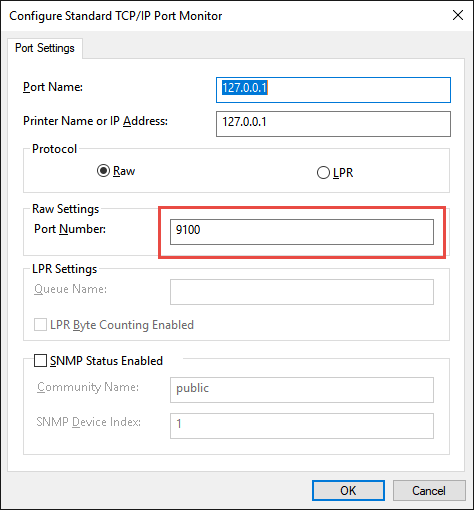
Set which port on your local machine will be used for tunneling the print job. 9100 is set as default.
Important: Keep in mind that the tunnel binds to the port specified here, so if you change the port here make sure that you change the port to the new value in the next steps as well.
Step 9
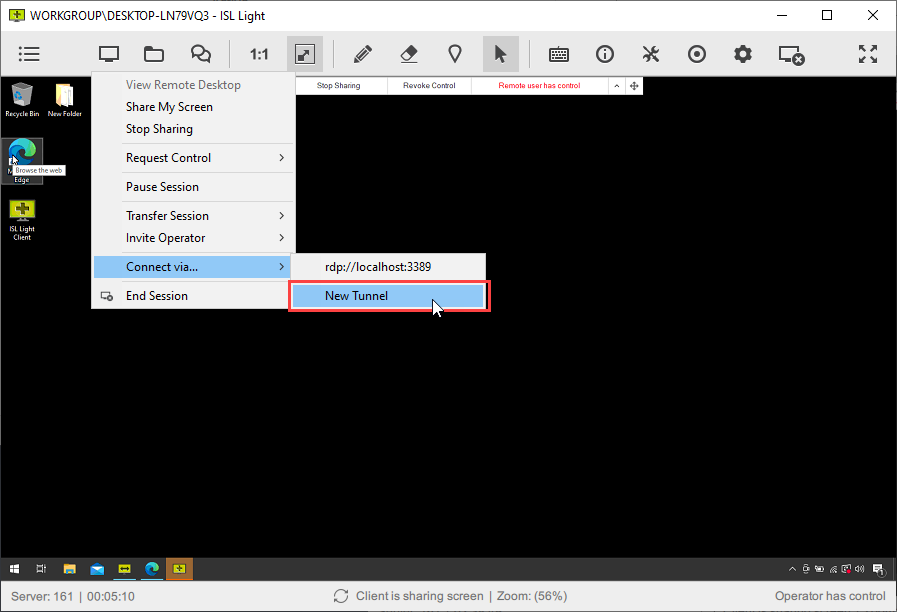
With printer port configured connect to computer B with ISL Light and click on "Connect via..." and "New Tunnel".
Step 10

Select the tunnel type as Custom and enter the configuration as seen above. The values are the following:
-
Remote
- addr - IP address of the remote printer inside its network.
- port - port on which the remote printer is listening. 9100 is the default port for printers so if you do not know it you can try with this value.
-
Local
-
addr - you can specify the following two values:
- localhost - you will only be able to print on the remote printer from your computer.
- any - any computer inside your network can use your computer as a jumbox to print on the remote printer.
- port - port you configured in the steps above.
-
addr - you can specify the following two values:
-
times - how many times the tunnel will accept connection.
- If you leave it at 1 you will only be able to print 1 document. If you remove this line completely you will be able to print on the remote computer until you manually close the tunnel or ISL Light session.
Related Articles: