This section describes how to add and configure a customer satisfaction poll. This poll is presented to your users after they finish their chat with the operator. A customer satisfaction poll can be set up as a simple web page (HTML). Please follow these steps to create an example poll:
- In ICP administration navigate to User management -> Domains menu.
- Click on the domain name to open Domain default settings.
- Click on the ISL Pronto in the top menu list.
- Set the Open link when client closes chat to: /users/custom/poll.html (this can be also set in Configuration-> Advanced-> Customize menu).
- Upload the file custom_raw_content_poll.html into File storage -> Private.
- Upload the file custom_raw_content_poll_ok.html into File storage -> Private.
Note: File names can be different, but their structure is very important. You can only change the very last part of the file name: e.g.: custom_raw_content_<poll file name>.
If you for example upload a file named custom_raw_content_mypoll.html, then you should set the "Open link when client closes chat" to: /users/custom/mypoll.html
Users will be redirected to the poll when they click the "End Chat" button. When users submit the poll, they will be redirected either to the redirect or redirectOnError link defined in the custom_raw_content_poll.html html document (see the next section).
Submitting the data to ISL Pronto chat
When the user clicks Submit, the poll results will be sent to the chat object in the database. Description of the keys:
- redirect: redirect to this link, when the poll is successfully submitted
- redirectOnError: redirect to this link, when the poll failed to submit (this might happen if the id or token is incorrect)
- token: security token to prevent multiple submissions of the poll
- id: unique chat id (from CGI parameter CHAT_HTTP_ID)
- MSGDATA_<KEY>: the poll result data
Poll results
Poll results can be accessed by two methods:
- HTTP event MESSAGE (see HTTP events), all the data is submitted with MSGDATA_<KEY>=<DATA>
- XMLMSG key messages (see Querying chat history)
Display poll results in your ISL Pronto Reports
You can also view the poll results in the ISL Pronto Reports.
You can configure:
- which fields are visible in the report
- under which names they are going to appear in the ISL Pronto Report
To configure this follow these steps:
- In ICP administration navigate to "User management" -> "Domains" menu.
- Click on the domain name to open "Domain default" settings.
- Click on the "ISL Pronto" in the top menu list.
- In the field "Reports message field list", list all the fields you wish to make available in your report.
Example: Your field names from the custom_raw_content_mypoll.html are called MSGDATA_satisfied and MSGDATA_comment. In this case, you would enter: satisfied, comment - If you also wish to expose the time of poll submission add start keyword to your "Reports message field list".
Example: satisfied, comment, start - Next you can configure the names under which these fields are going to appear in the report. Set the "Reports message field titles (f1=Title1&f2_<lang>=Title2)" field to desired values.
Example: satisfied=Satisfied&comment=Comments&start=Start Time - Save the settings at the bottom of the page.
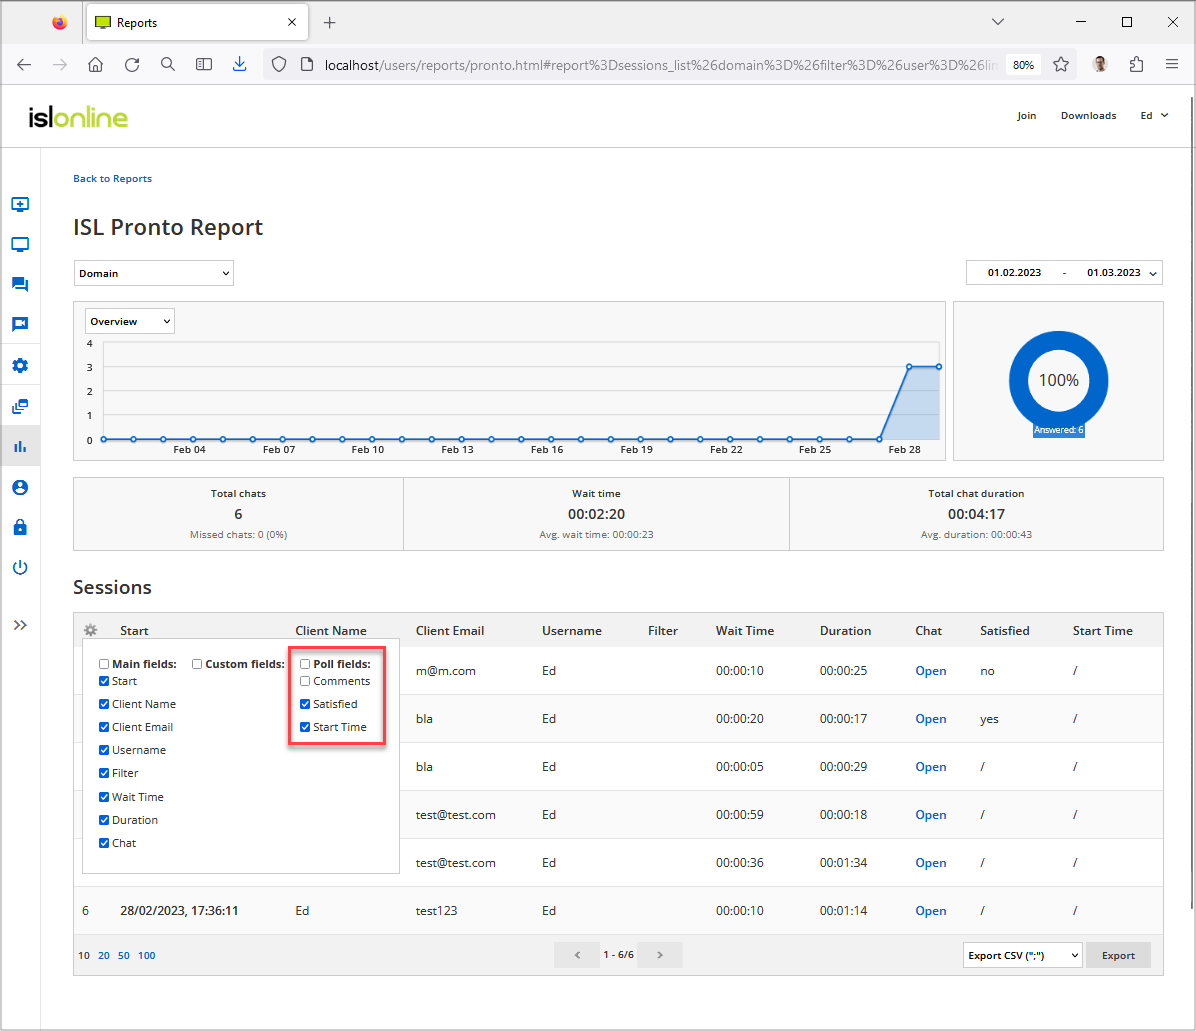
- To check the configuration, log into your account. Navigate to "Reports" and select "Live Chat (ISL Pronto Report)".
- Press the
 button to select, which session fields should be displayed for each session. You should see the Poll fields section where you can check the poll fields you wish to see.