With macOS Big Sur (11), Apple has additionally changed how applications can obtain access to the system resources and how to manage their permission. The biggest change comes via the updated Gatekeeper in Big Sur. Applications installed outside of the App Store must now be notarized by Apple to be launched seamlessly.
Currently, ISL Network Start is notarized, meaning that any ISL Online application downloaded via Network Start will be trusted by the Gatekeeper. Network Start is used except when downloading an ISL Online product directly from https://islonline.net/download. If the ISL Online product is downloaded directly (we advise the use of Network Start), the Gatekeeper will prevent it from running. There is however a workaround described in the chapter Downloaded Directly.
Refer to the appropriate chapter to see how ISL Online applications are run in macOS 11:
Running ISL Online applications:
Downloaded via Network Start
Network Start is used almost every time you download the ISL Online application. In this example, we will be downloading ISL Light from the Downloads page on https://www.islonline.com. This is the most common use case, where ISL Network Start is used.
Step 1
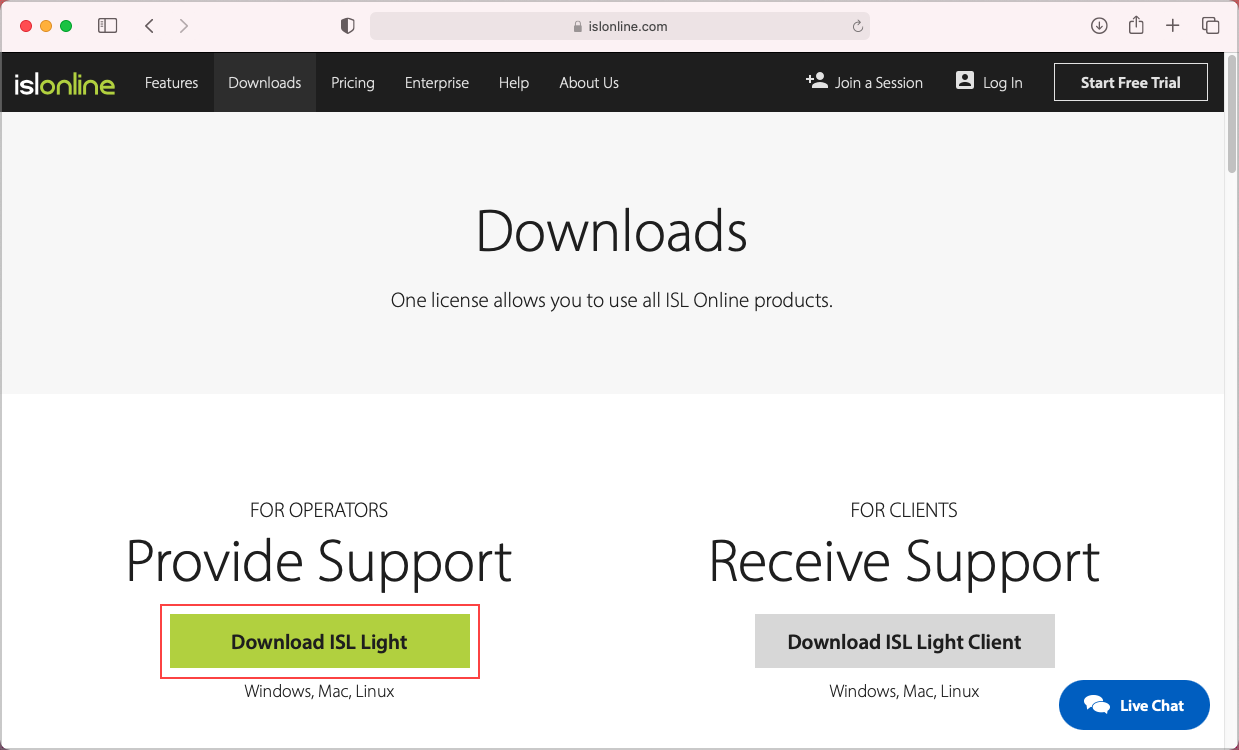
Download ISL Light.
Step 2
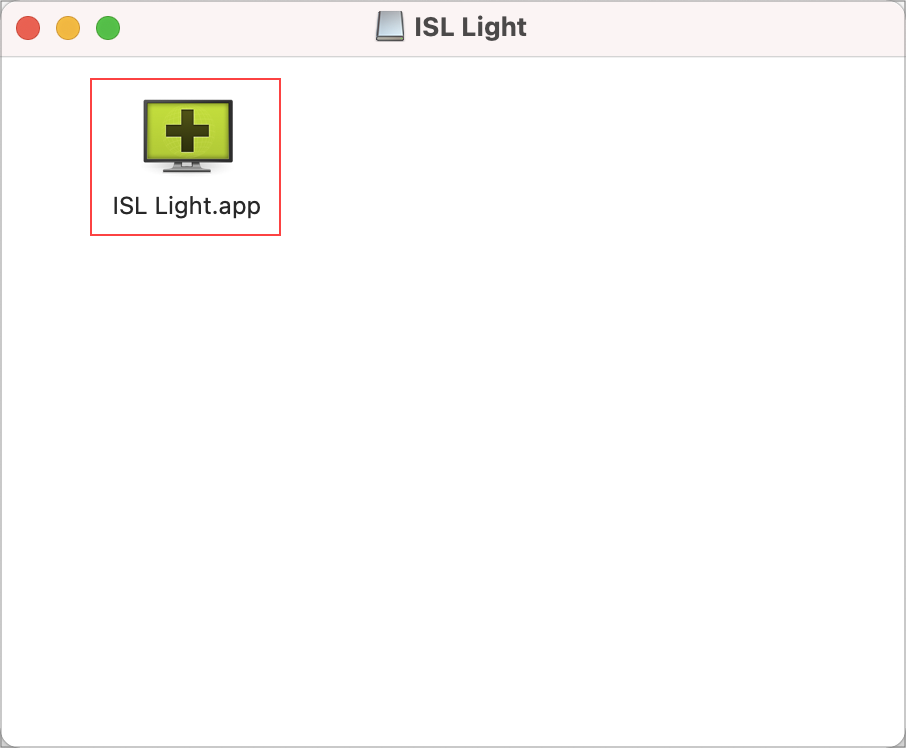
Double-click the ISL Light icon to launch ISL Network Start and download ISL Light.
Step 3
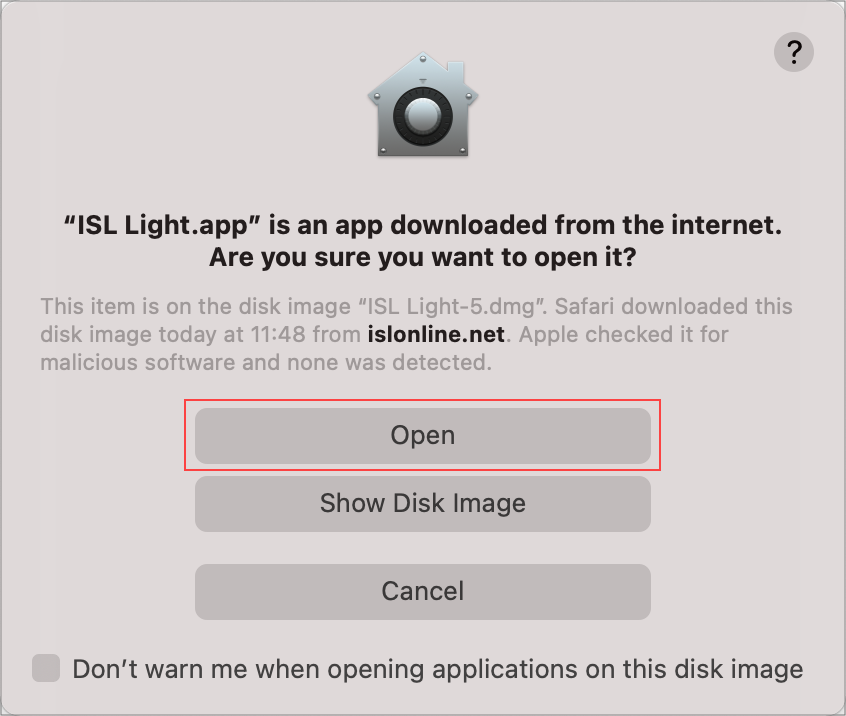
Click on "Open" to launch ISL Light.
Step 4
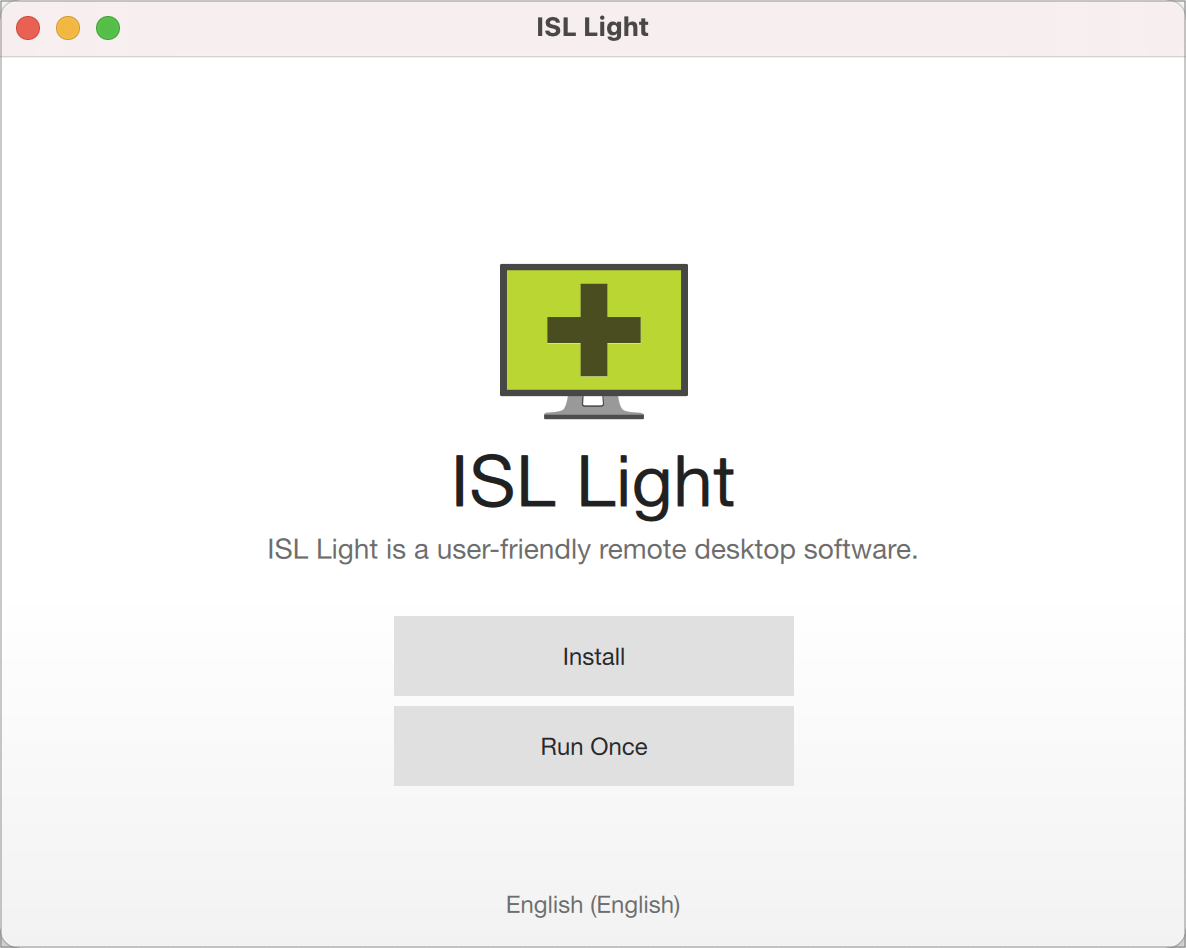
Installation of ISL Light will begin without any additional security prompts.
Downloaded Directly
Step 1
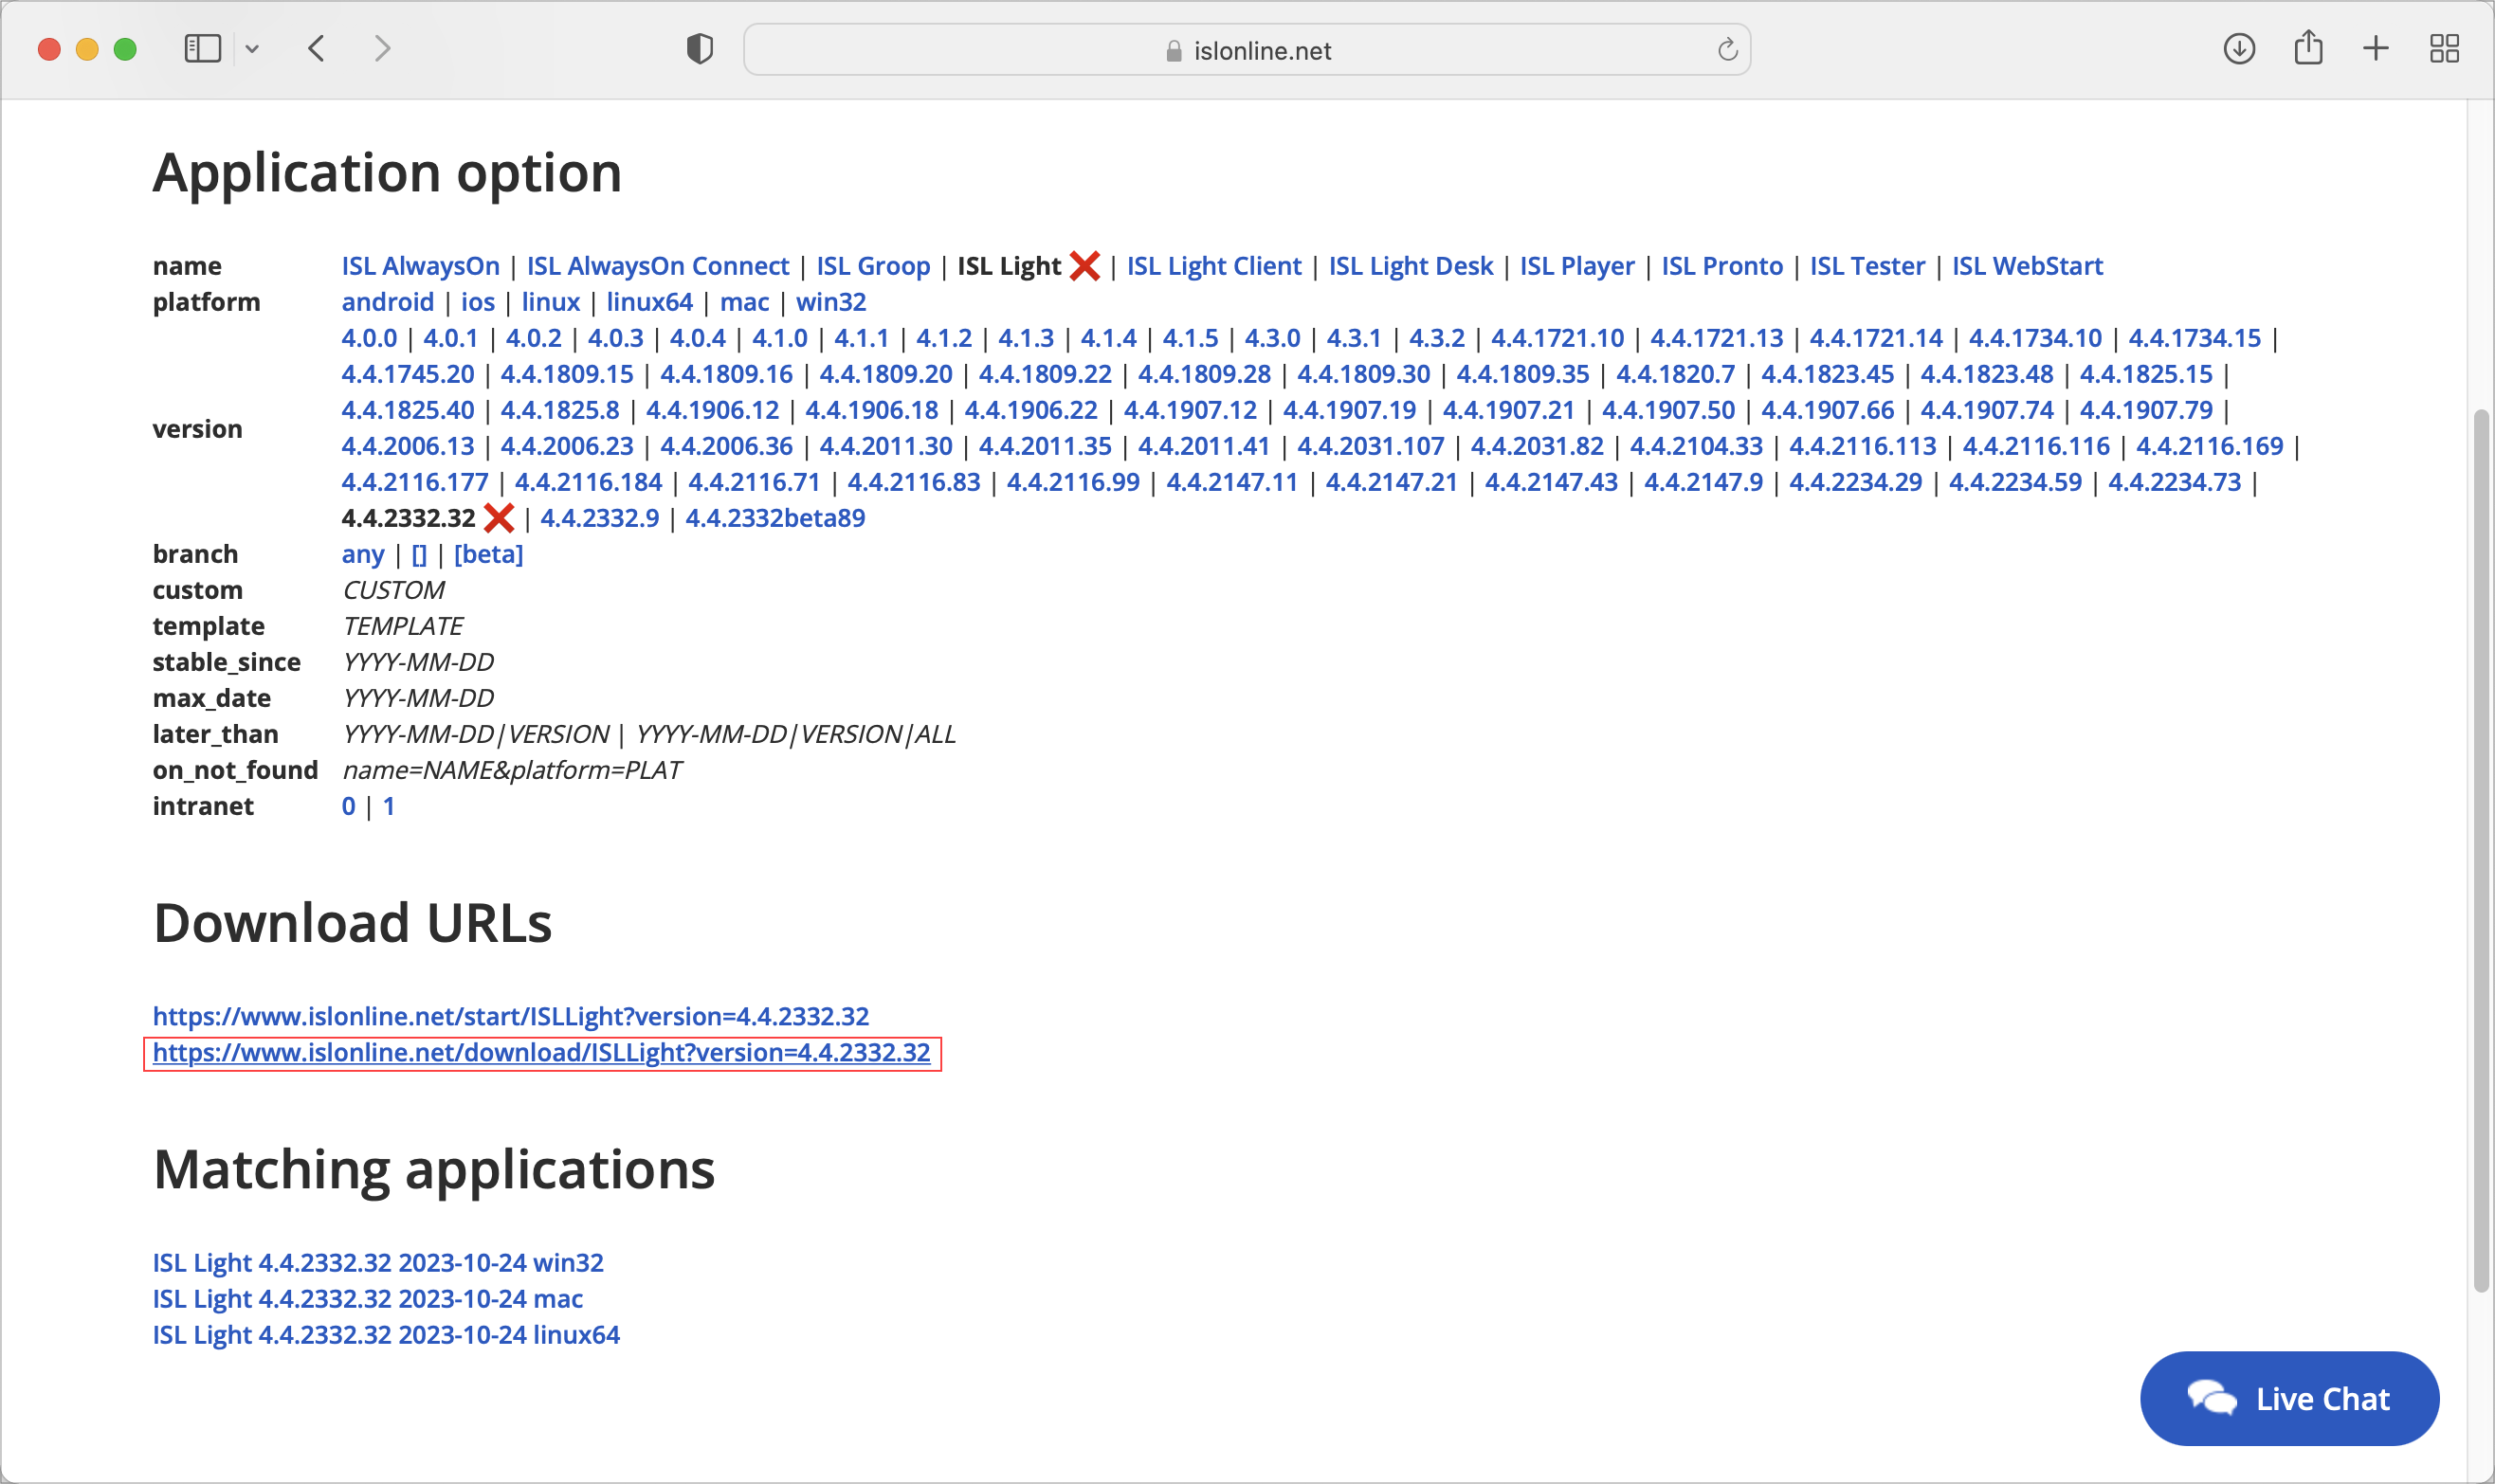
Download ISL Light from https://islonline.net/users/programs
In this case, the ISL Network Start is not used and the application is downloaded directly.
Step 2
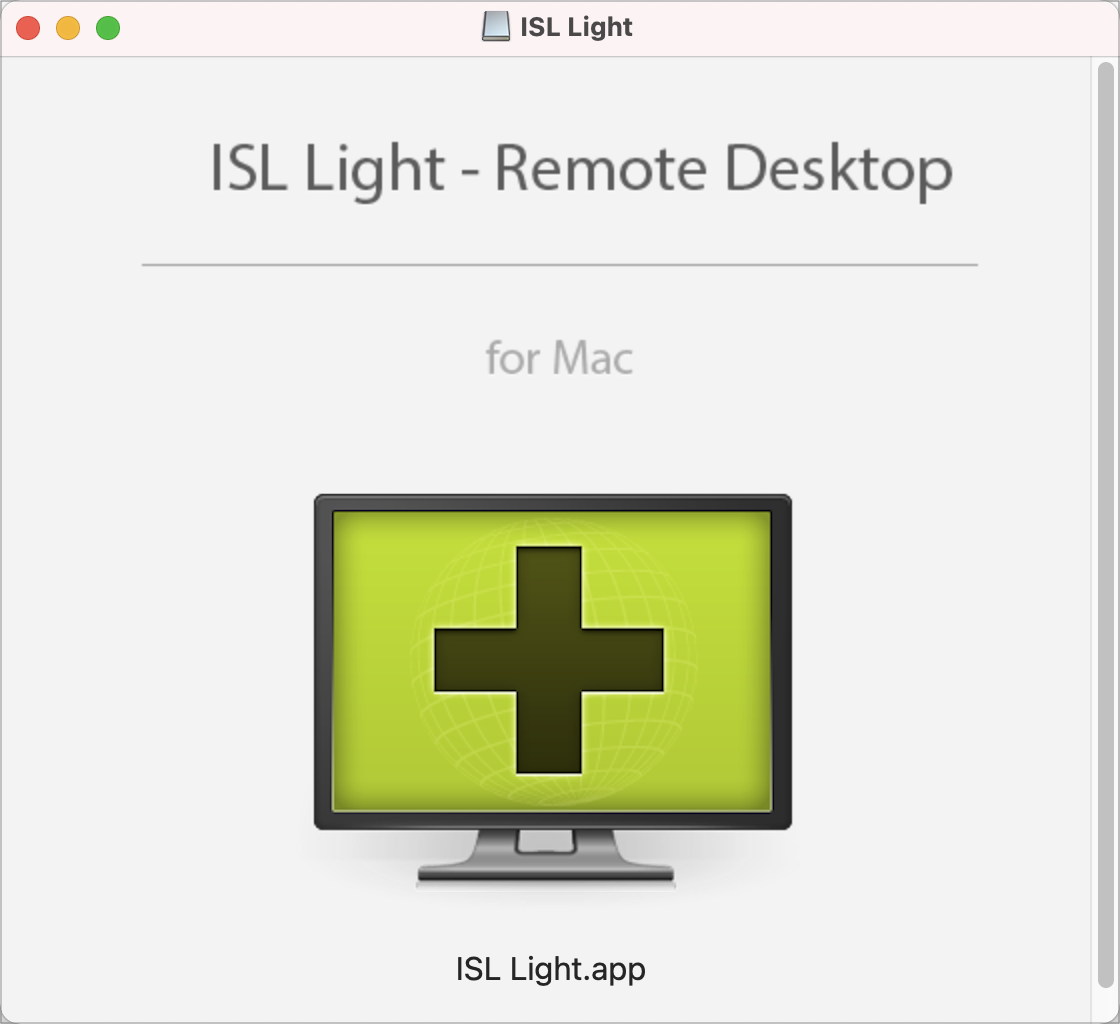
Double-click the ISL Light icon to launch the application.
Step 3

Since ISL Light is not notarized the Gatekeeper will prevent it from opening.
Step 4
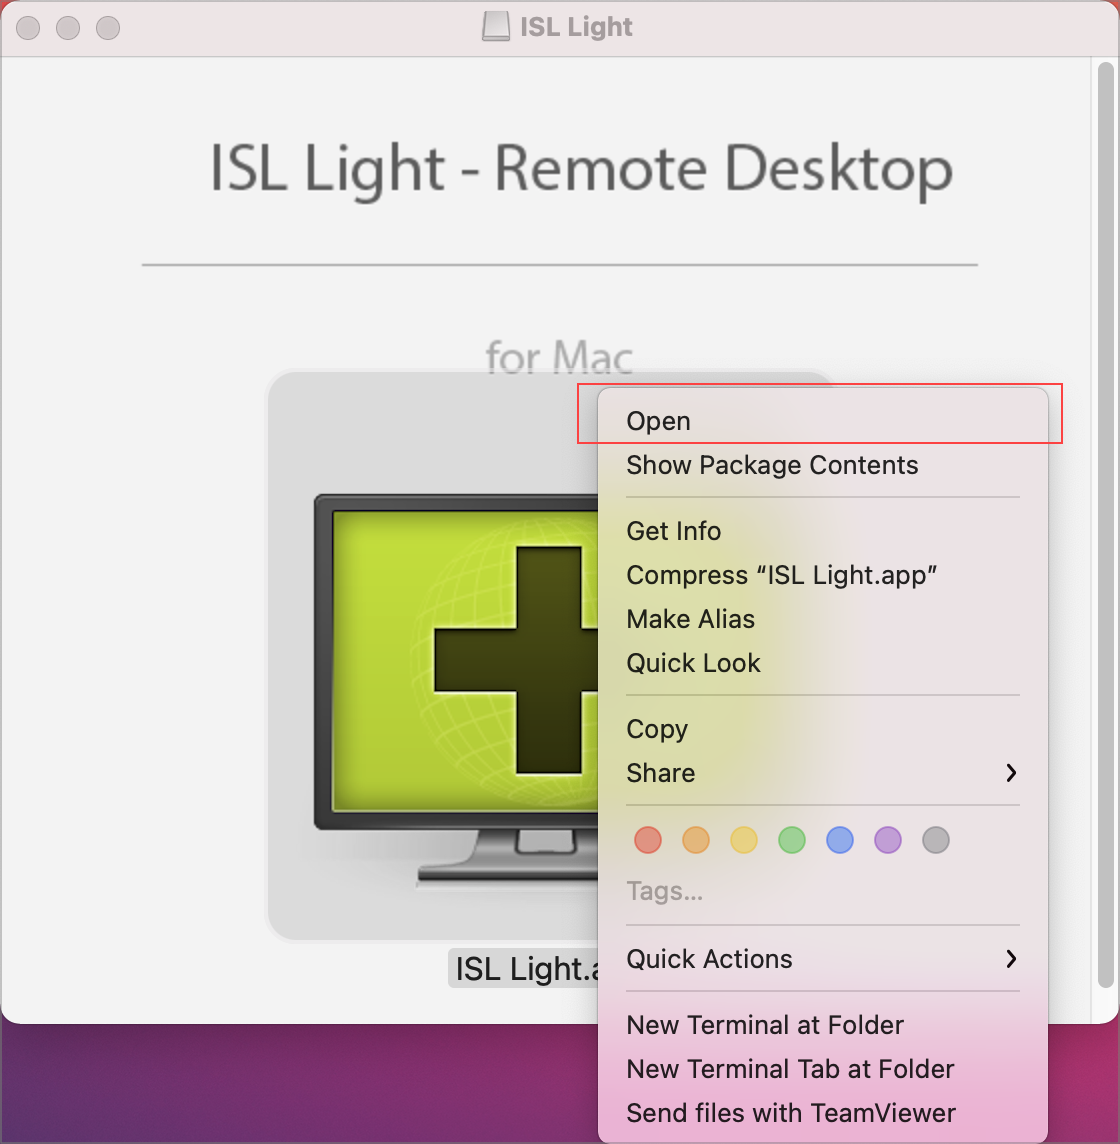
Right-click the ISL Light icon and click on "Open".
Step 5
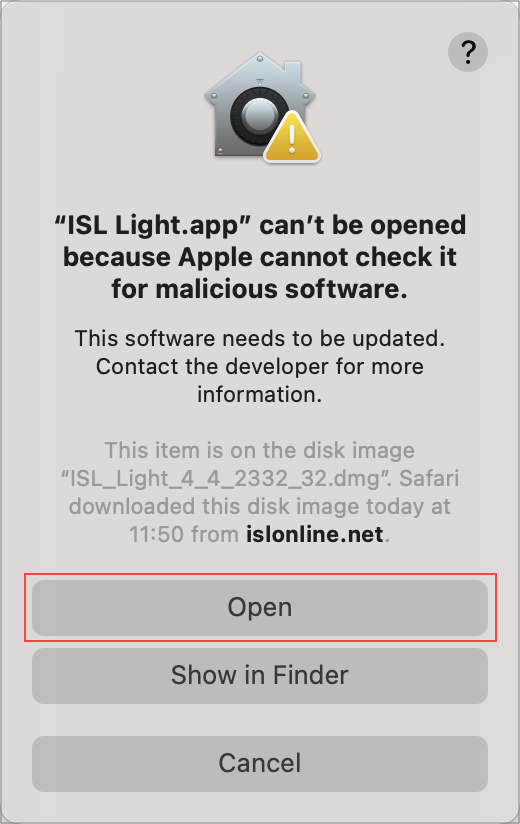
This time you have the additional option "Open" available. Click on it to begin the installation of ISL Light.
Application permissions
ISL Light Client
Running ISL Light Client will require two permissions to be added to enable a fully functional remote session. You will be prompted to allow both of them via the Security & Privacy settings on your Mac in the following sections:
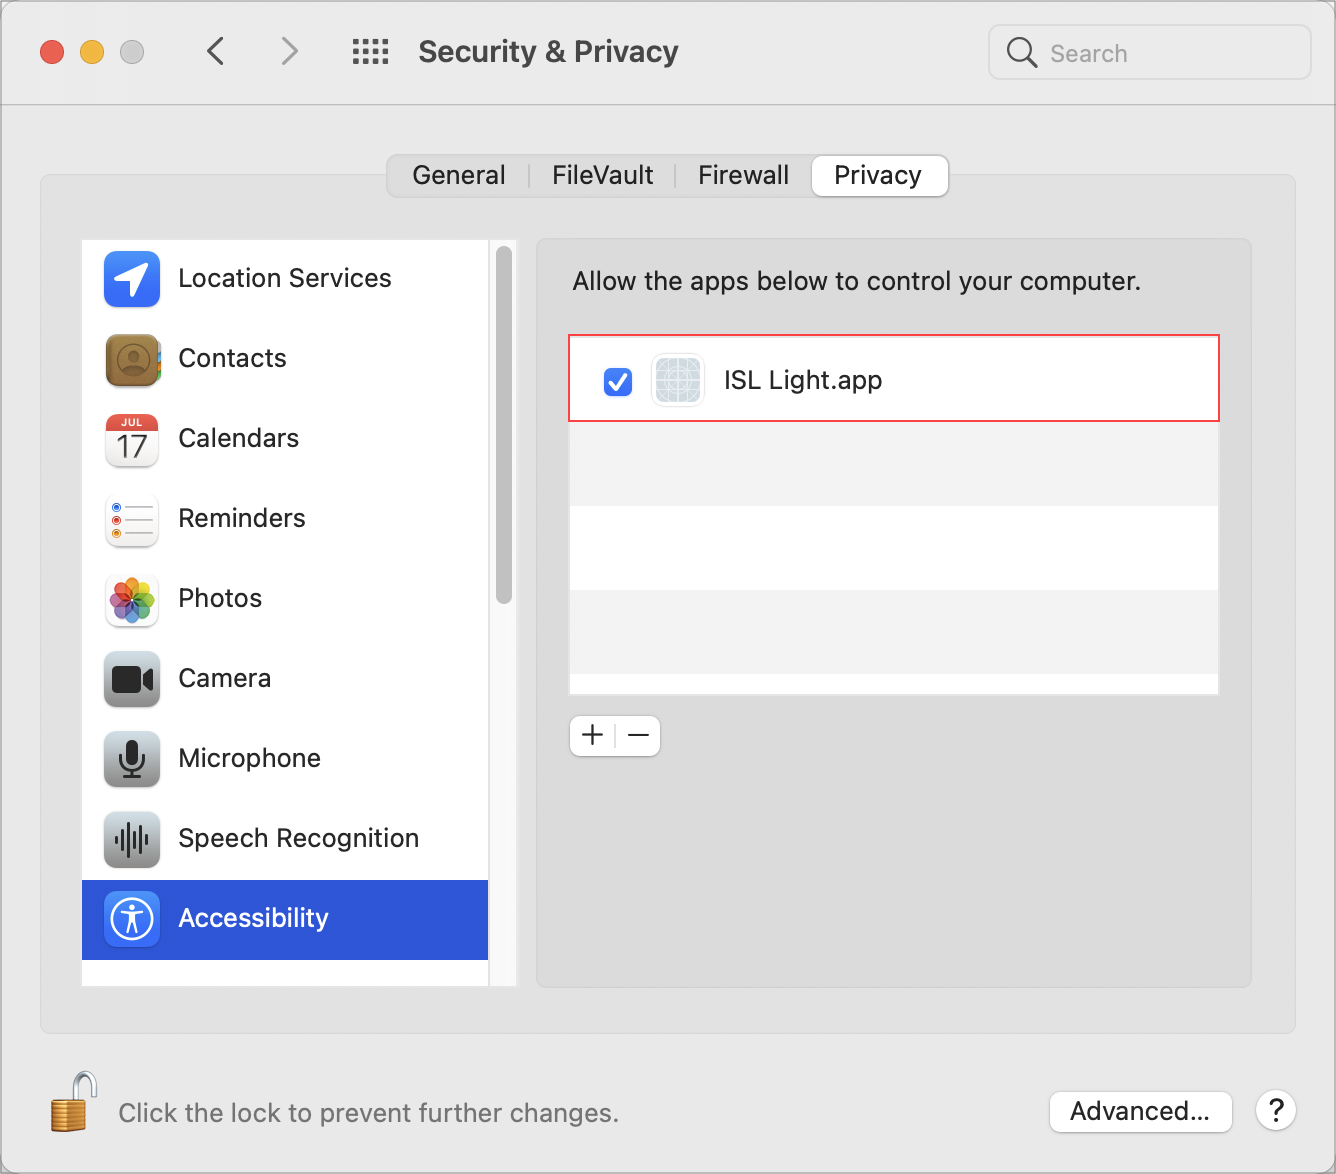
1. Accessibility - This will allow the operator to control your mouse and keyboard
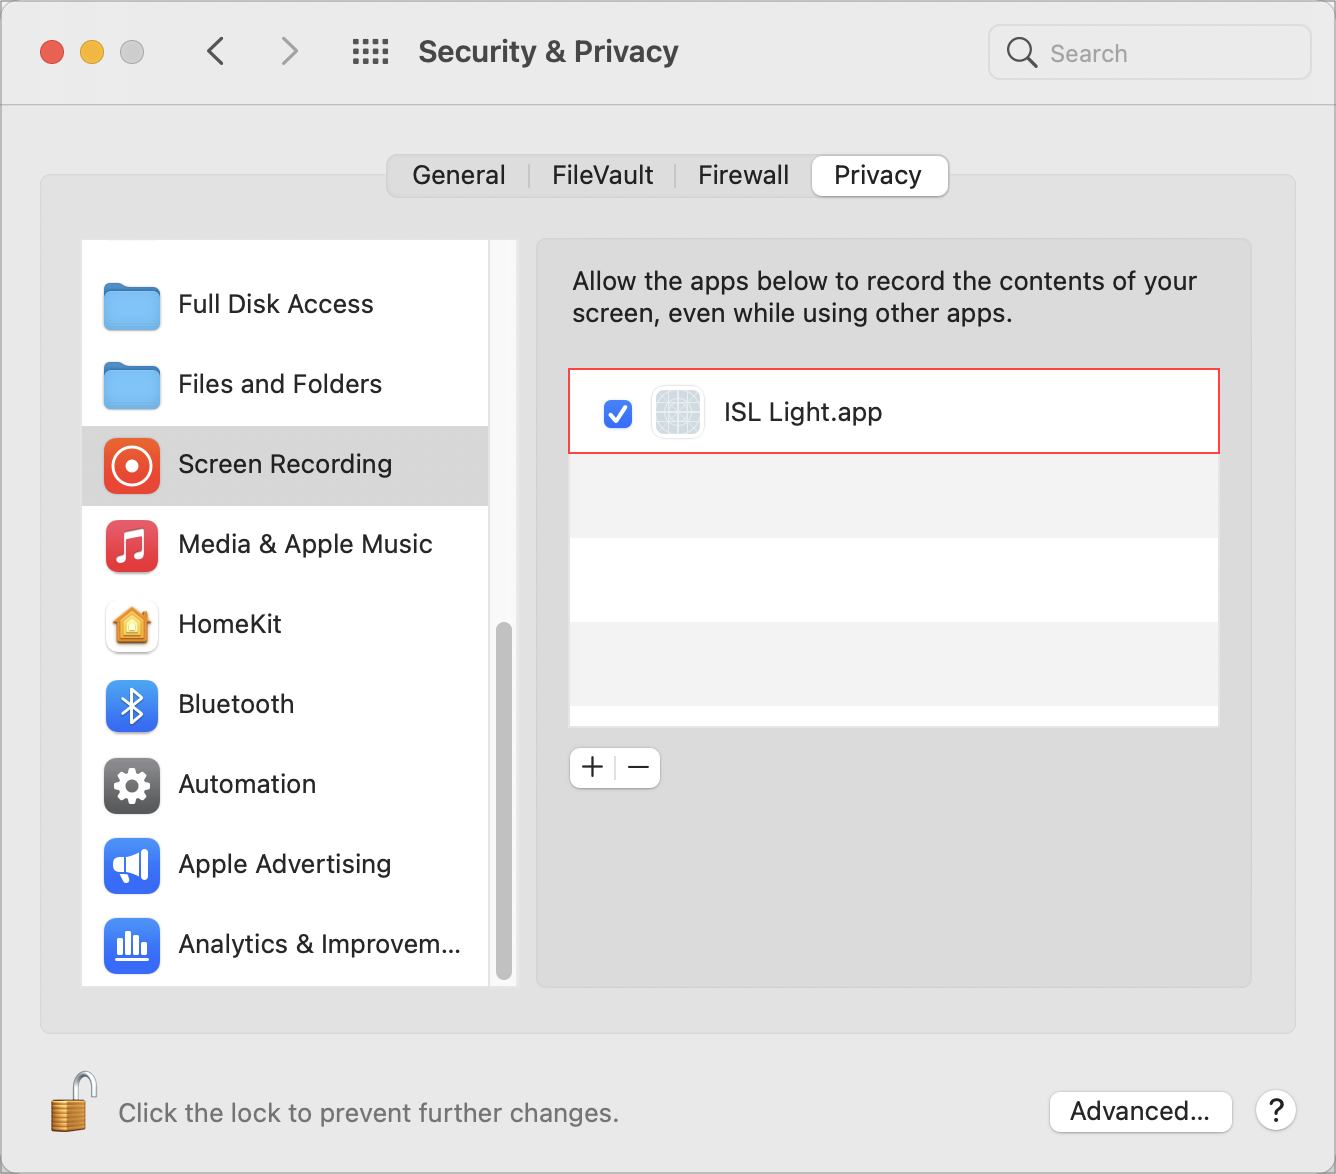
2. Screen Recording - This will allow the operator to view your screen. Once you grant the Screen Recording permission the Operator will have to restart the screen-sharing stream to view your desktop. The Operator will have to select the Stop Sharing option first and then View Remote Desktop option, as shown here: Desktop Sharing
Note: Due to a naming scheme of ISL Light Client on newer macOS versions, the application is shown in the permission window as "ISL Light.zip.app". Once you grant permissions for ISL Light Client you won't have to grant them again in subsequent sessions.
ISL Light Client - Restart and Resume Functionality
Restart and Resume functionality of the ISL Light session is handled by a new process. Instead of ISL Light Client, the process is now issc_daemon. As a user, you won't notice anything different, however, in macOS Big Sur (11) the issc_daemon is treated as a new and completely unrelated process, which means you will have to re-approve all the permissions given to ISL Light Client beforehand.
The process is shown below:
Step 1 (Operator side)
The operator requests the Restart and Resume functionality to be enabled.
Step 2.1 (Client side) 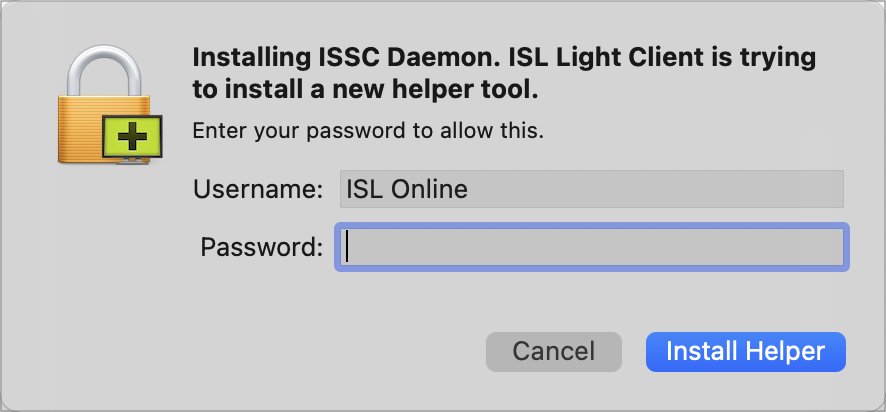
Step 2.2 (Client side)
The client will have to allow ISL Light Client in Screen Recording and Accessibility in the Security & Privacy settings of macOS.
Step 3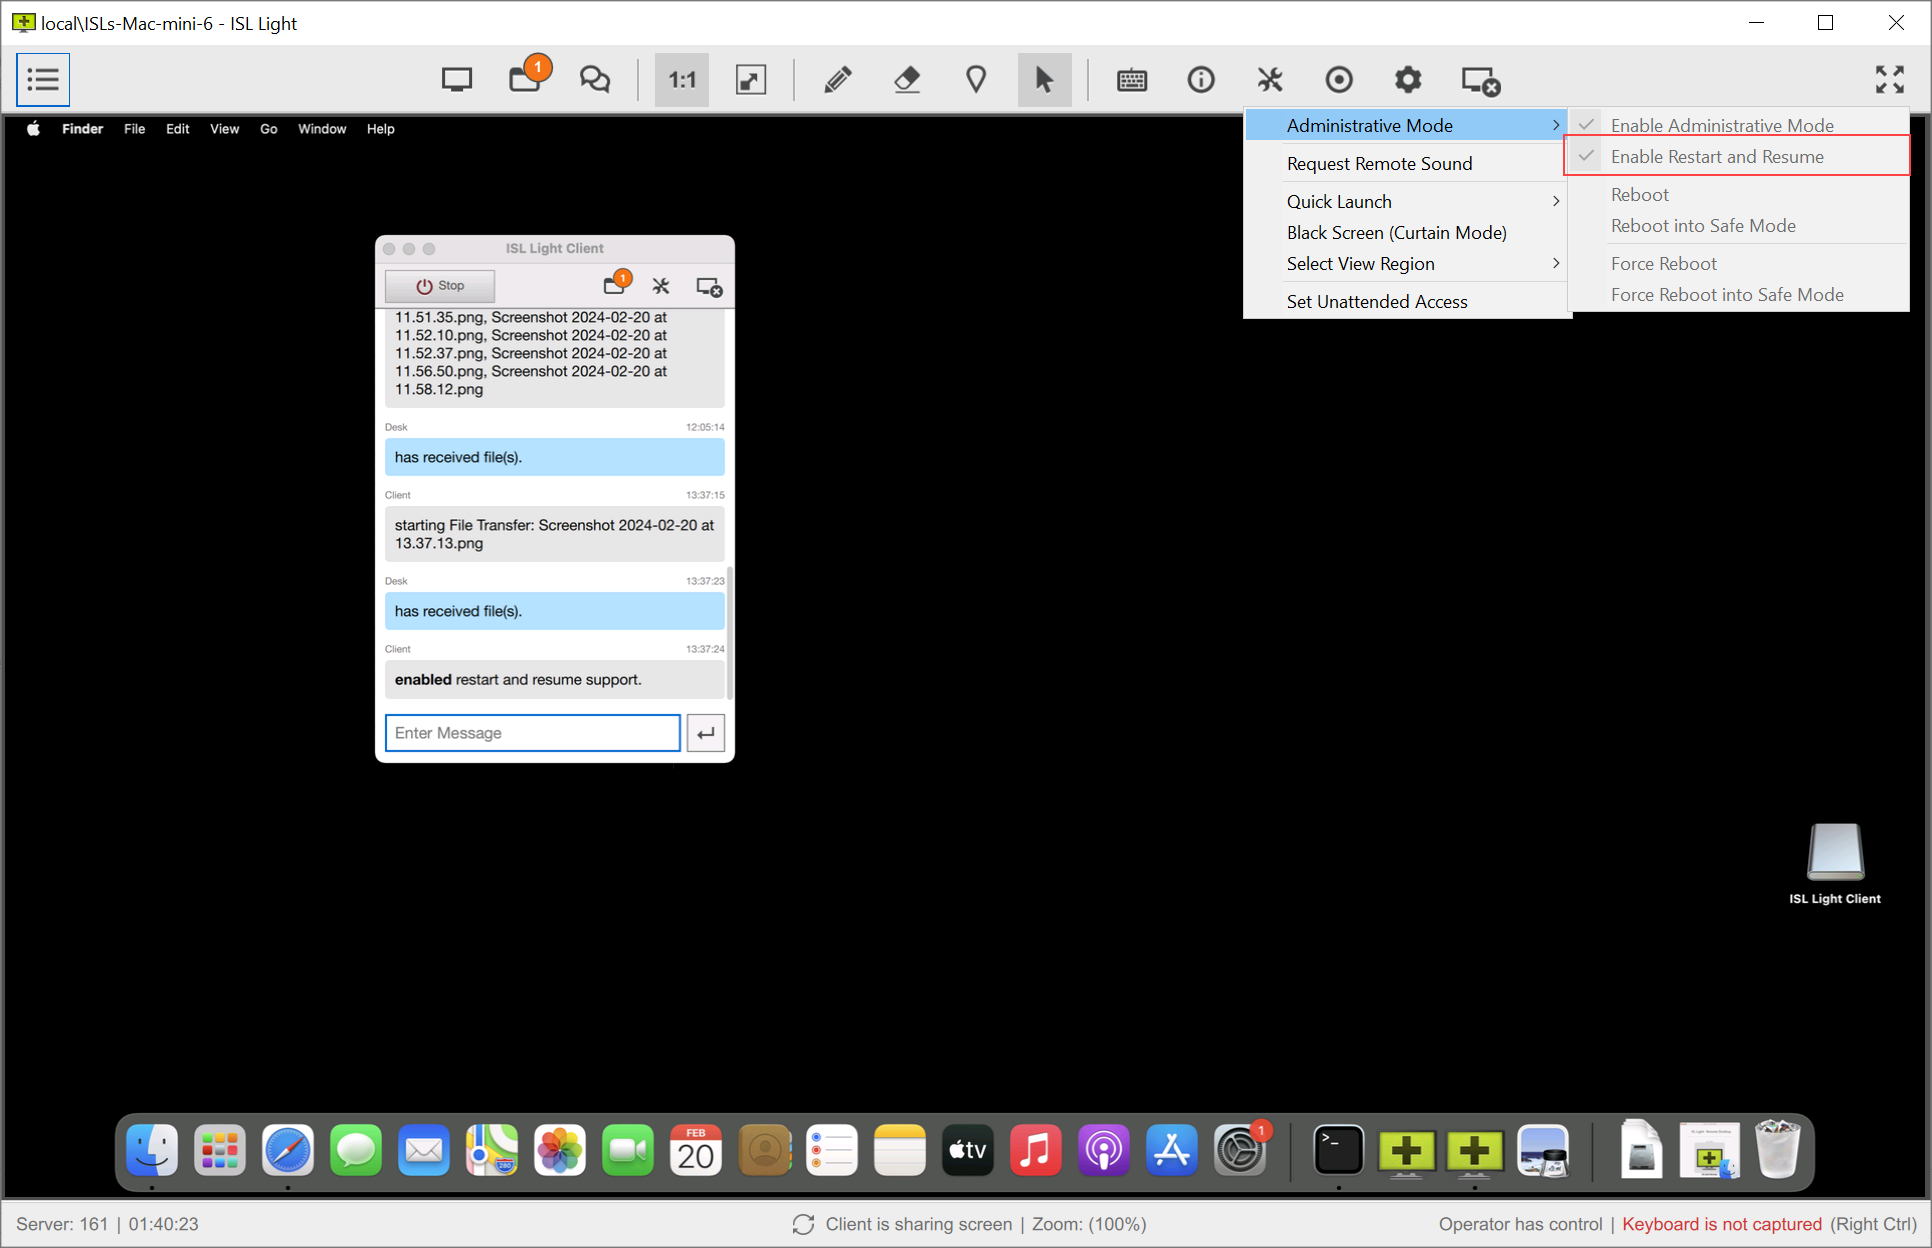 Now the operator has successfully enabled Restart & Resume functionality.
ISL AlwaysOn
Similarly as with ISL Light Client the ISL AlwaysOn will require permissions from Accessibility and Screen Recording sections as seen below.
Important: Permission in macOS Big Sur (11), can only be approved when permission itself is requested by the application and not in advance. In the case of ISL AlwaysOn, this means that it is advisable to start a session as soon as you install ISL AlwaysOn on a new machine since a client will be there to confirm the permission requests. If this is not done you will be able to connect to a remote computer successfully, however, you will not be able to see its screen or control it until somebody on the remote side confirms the necessary permissions.
To remotely access the macOS remote computer(s) you need to enable TCC (Transparency, Consent, and Control) for the ISL AlwaysOn application on macOS.
TCC (Transparency, Consent, and Control) is a mechanism in macOS to limit and control application access to certain features, usually from a privacy perspective. This can include things such as location services, contacts, photos, microphones, cameras, accessibility, full disk access, and more.
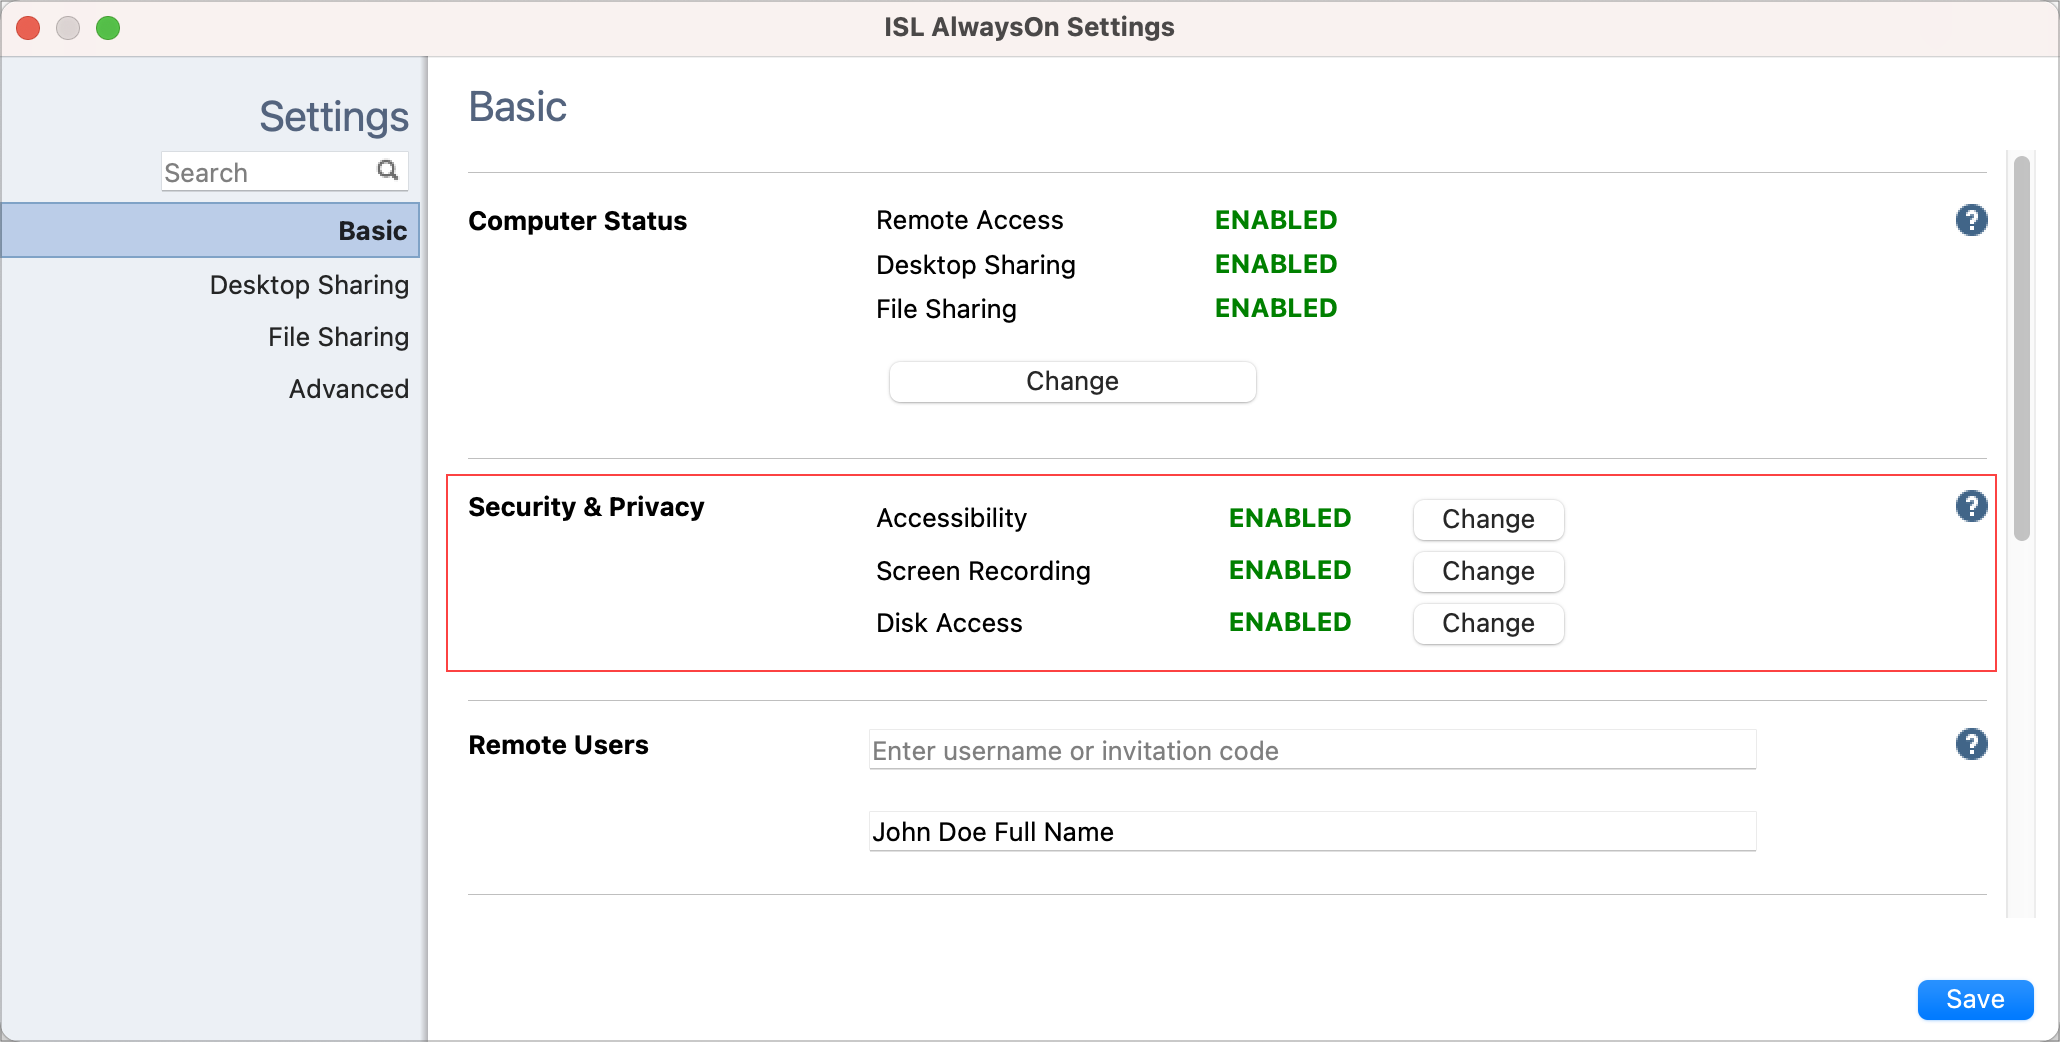
You can find a "Security & Privacy" section in ISL AlwaysOn settings:
- Accessibility (to enable remote control)
- Screen Recording (to enable screen view)
- Disk Access (to enable file transfer)
If the status for these Settings is DISABLED, ISL AlwaysOn does not have consent to either remote control the computer, view the screen, or transfer files with a remote computer.
Enable Remote Access on macOS
Step 1

Open "Settings" in ISL AlwaysOn.
Step 2
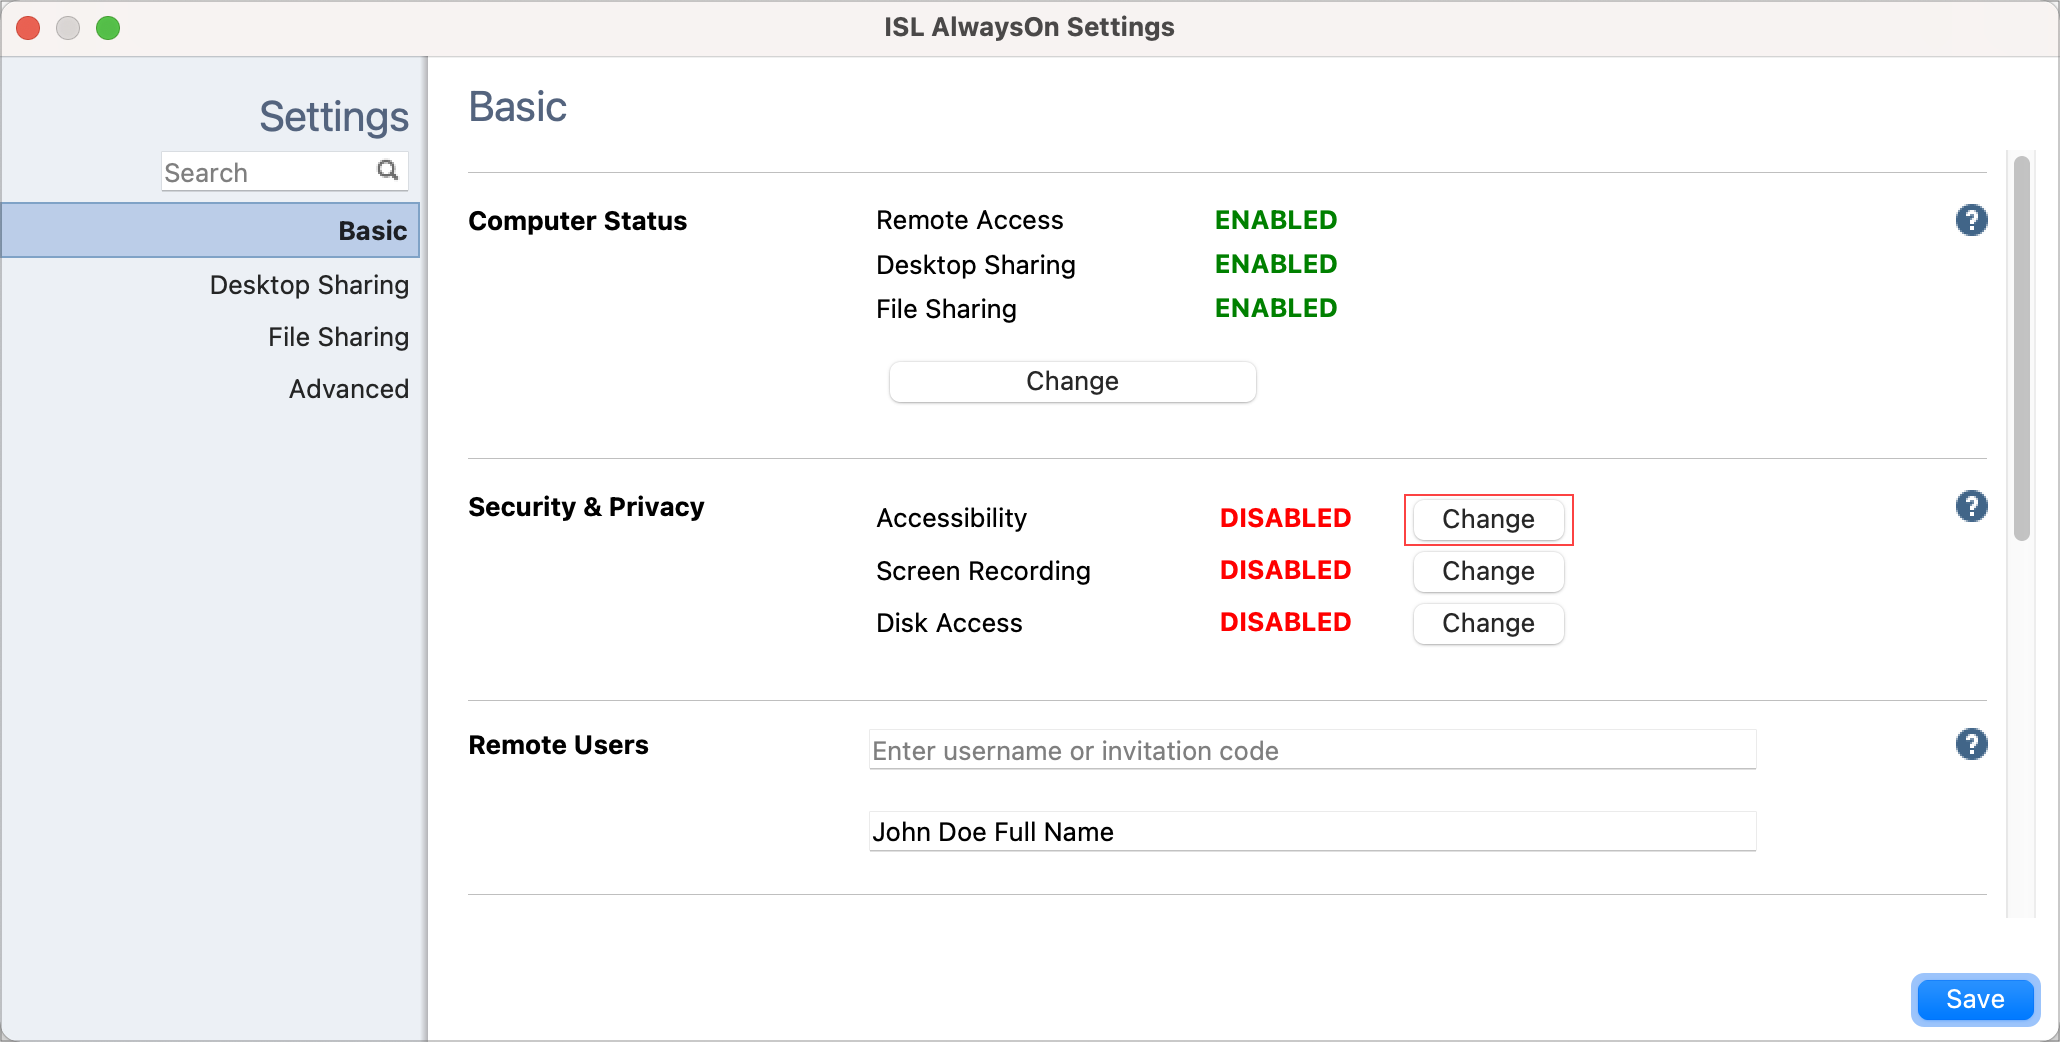
Click the "Change" button in the "Security & Privacy" section next to the "Accessibility".
Step 3
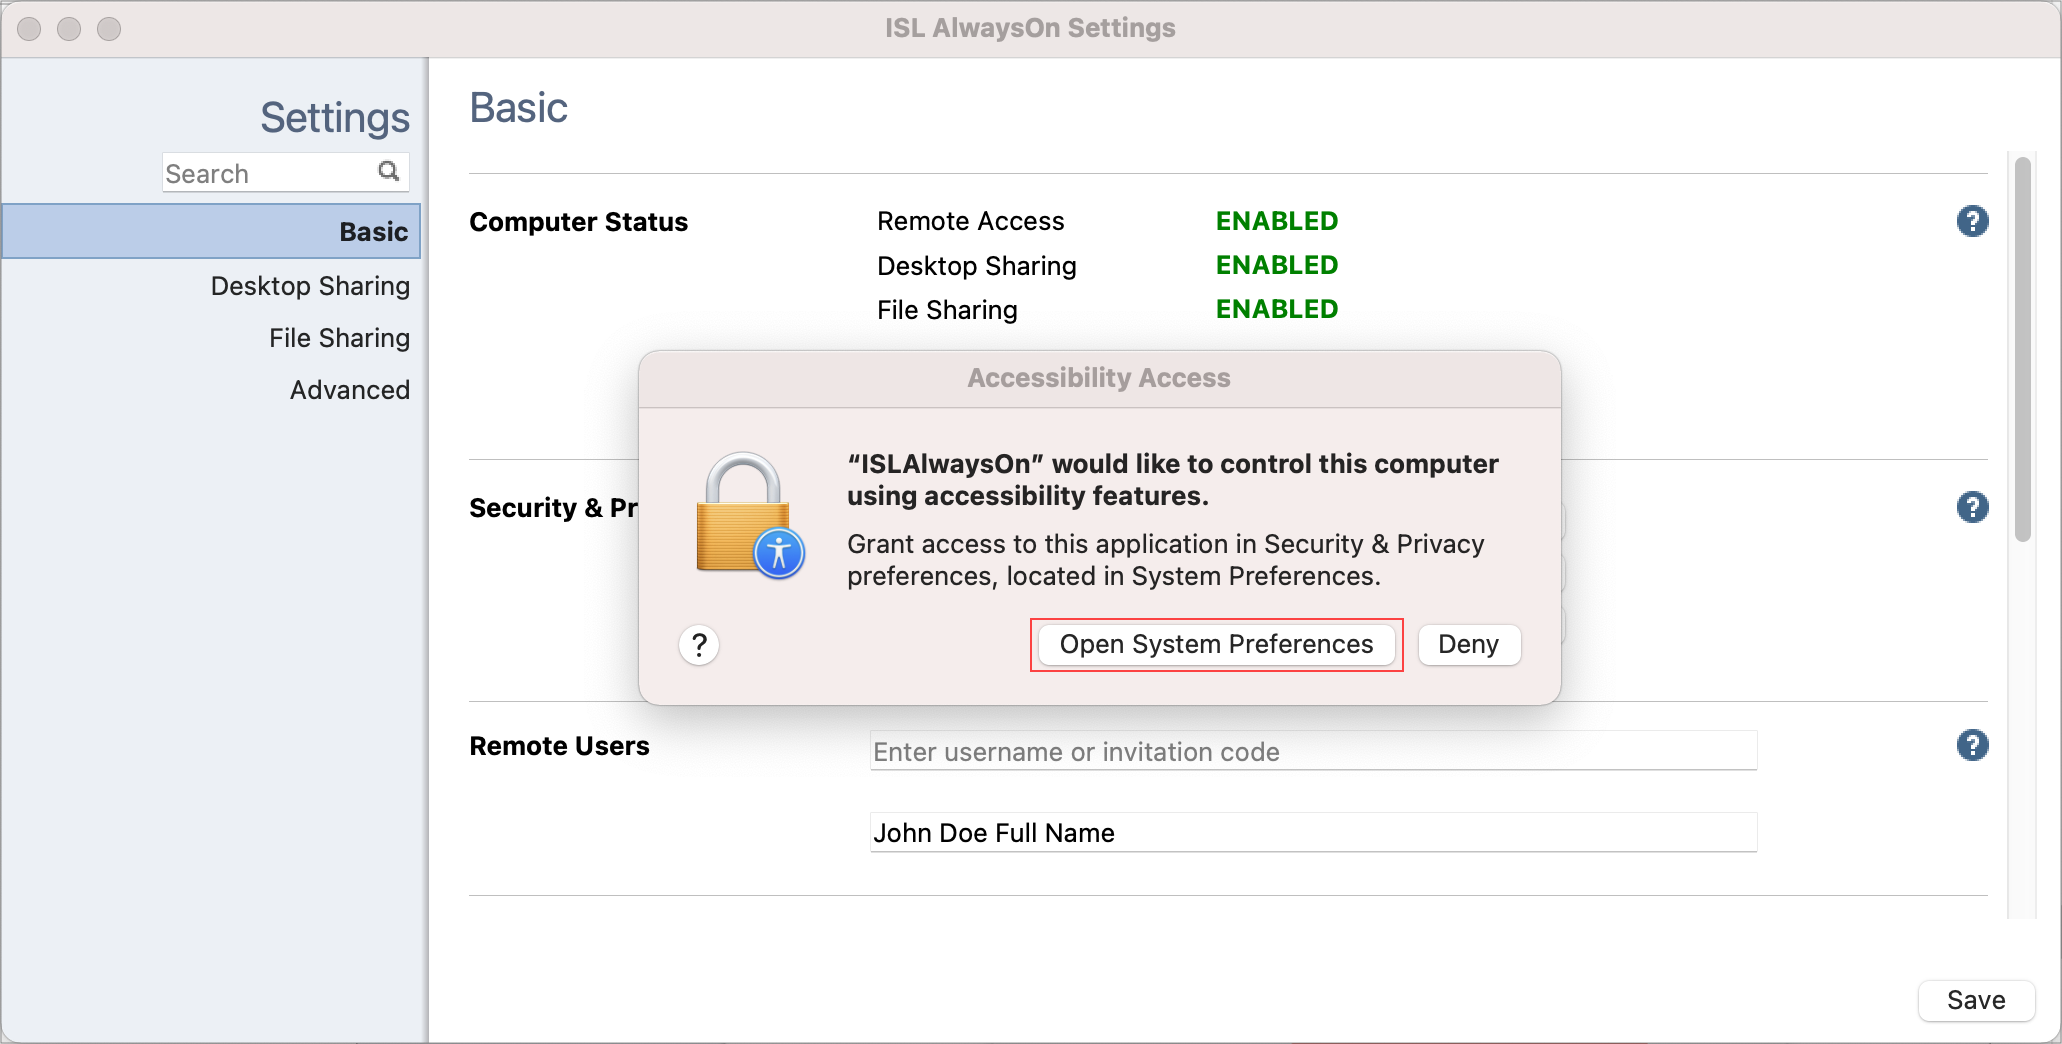
Click the "Open System Preferences" button.
Step 4
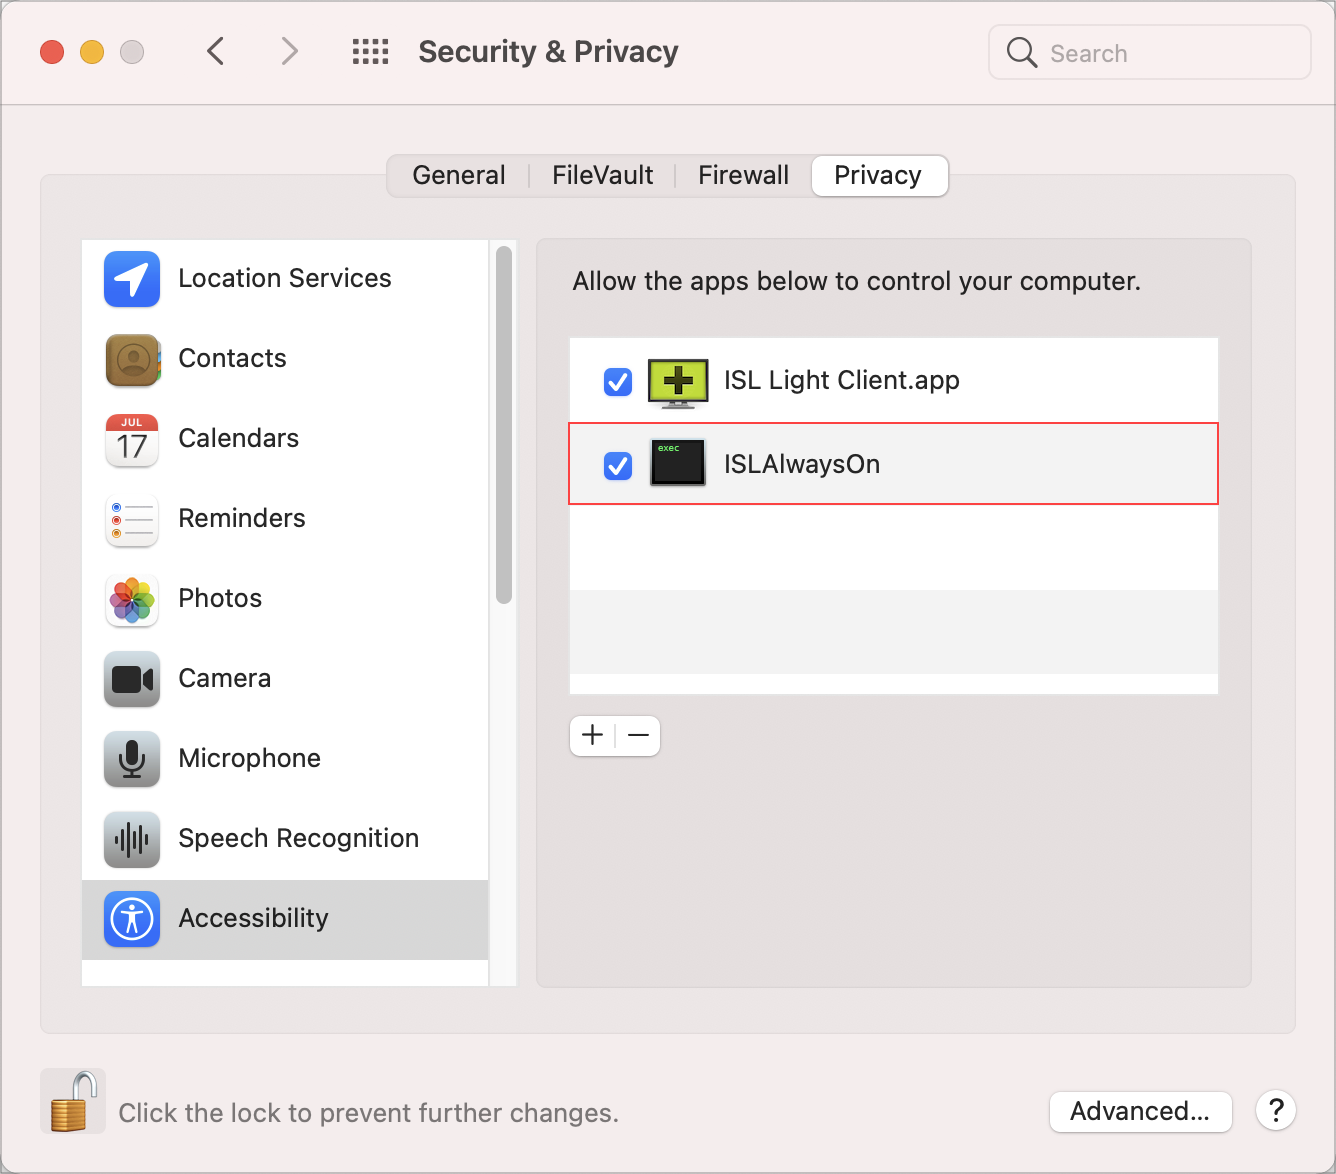
In the Security & Privacy window click the checkbox in front of the ISL AlwaysOn application. Repeat this step for Screen recording and Full Disk Access.
Step 5
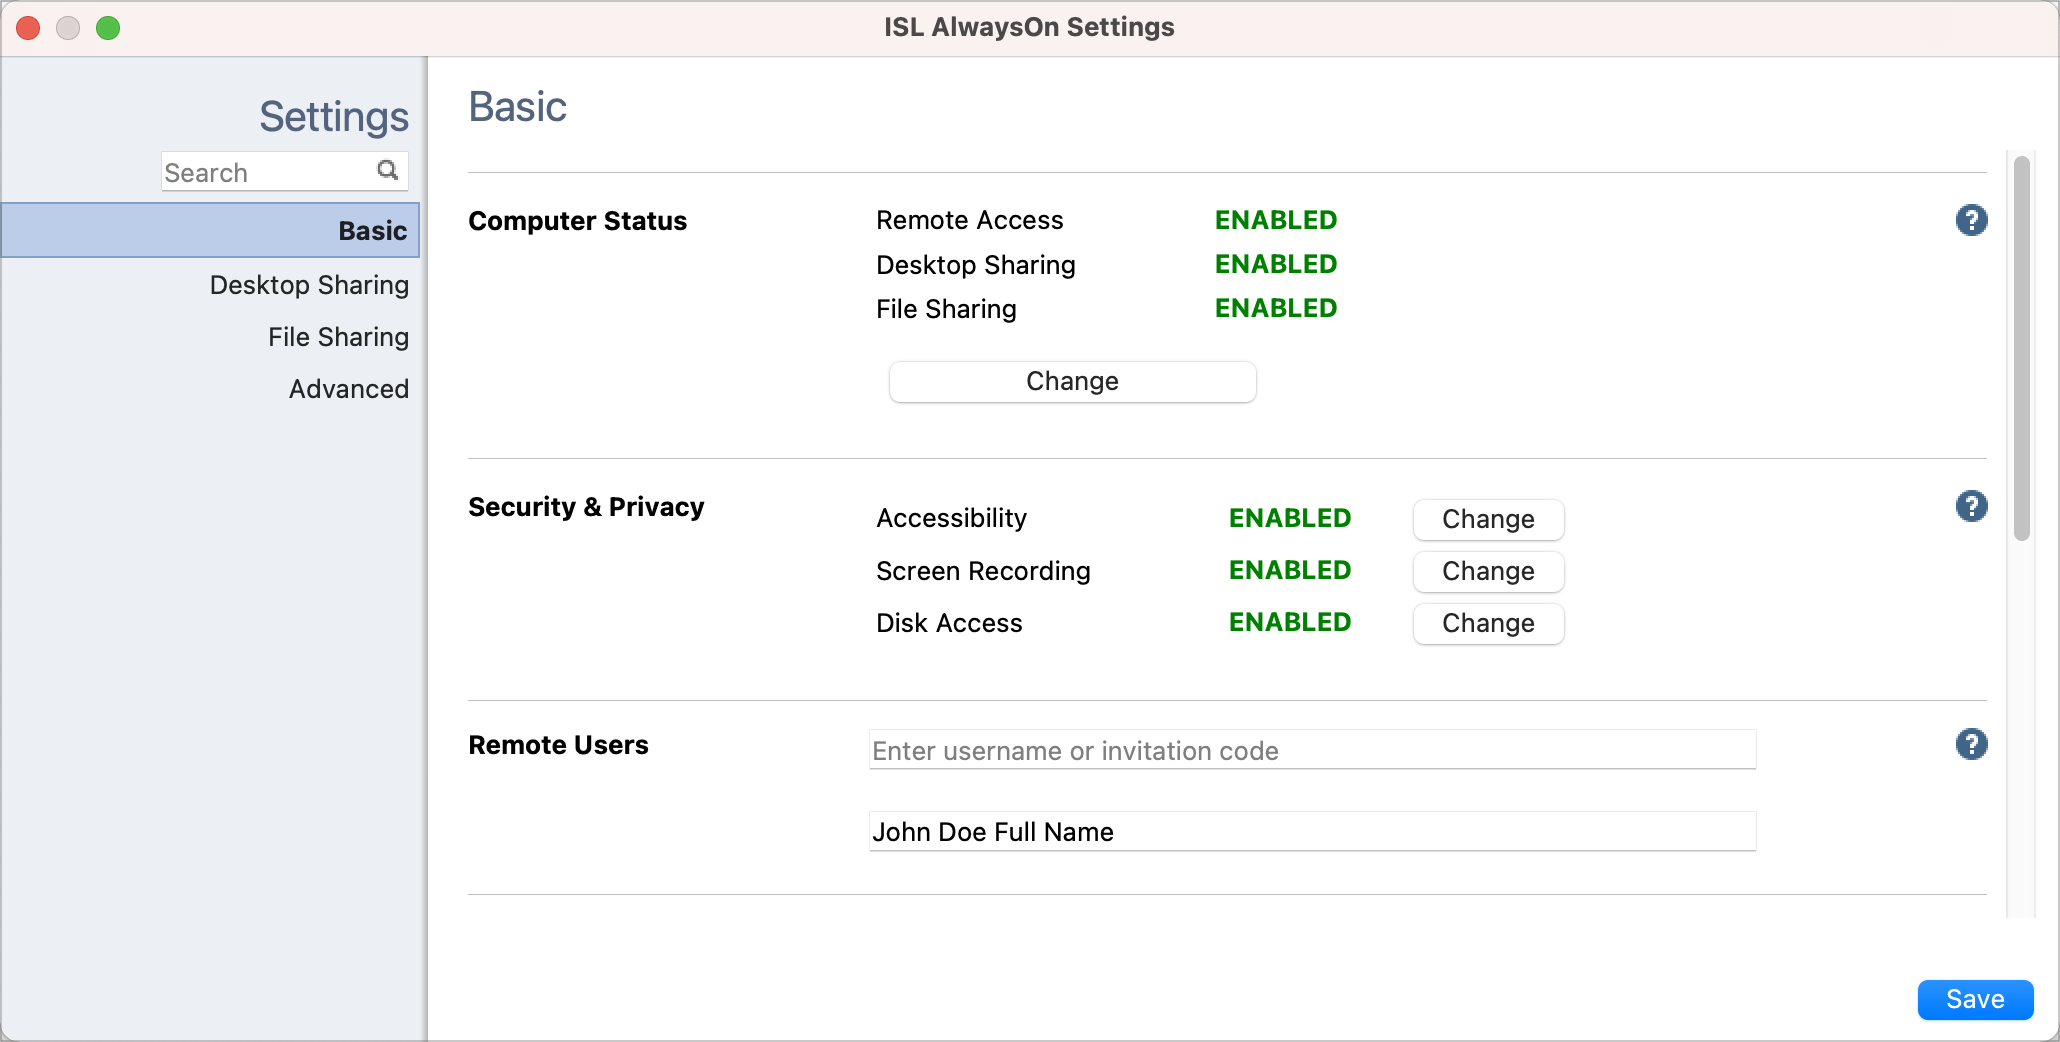
If all the needed permissions are enabled correctly the state of Security & Privacy in ISL AlwaysOn settings will change to ENABLED.
Using MDM solutions
Important: Due to the way ISL Online applications are designed it is currently only possible to create a privacy policy exception for ISL AlwaysOn and ISL Light Client through the MDM system. Other applications are currently in the process of supporting MDM and examples will be posted here as soon as functionality is enabled for them as well.
Note: MDM solutions are primarily meant to be used by system administrators who are responsible for setting up and configuring many machines.
With Apple's MDM solutions you can, among other things pre-approve certain applications to access system resources without the user having to approve a checkbox every time the application requests access to a new resource.
There are many different ways of MDM tools on the market that help you configure your devices, however, in all cases, you will have to provide the following information to create a privacy policy exception:
- Identifier - The unique identifying value for the binary or service. For applications, specify the Bundle ID - it is also possible to use the installation path for supporting binaries.
- Code Requirement - This is a unique string based upon the developer certificate that was used to sign the Identifier (binary or bundle ID). You can obtain this value by running the following command in Terminal.app:
codesign --display -r - /path/to/app/binary
- Static Code Validation - Some applications might intentionally make changes to themselves in memory. If you set Static Code Validation to True, macOS checks only the Code Requirement of the files on disk and not the application loaded in memory. Generally speaking, use this option as a last resort if you are sure the Code Requirement and Identifier are correct.
- Accessibility Privacy preferences - The accessibility section of the macOS Big Sur Security & Privacy panel allows apps to control your Mac in various ways. Certain ISL AlwaysOn and ISL Light/ISL Light Client apps and binaries need permission to gain access to Accessibility system services.
Please refer to the example for the relevant ISL Online product below:
ISL AlwaysOn
Binary ISLAlwaysOn requests access when a session is established using ISL AlwaysOn.
ISL AlwaysOn
The type of identifier:
Path
Path:
/Library/Application Support/ISLAlwaysOn/ISLAlwaysOn
Note: By using certain customization options the path on your device may be slightly different than in the example above. In that case please modify it accordingly.
Code Requirement:
identifier "com.islonline.islalwayson.main" and anchor apple generic and certificate 1[field.1.2.840.113635.100.6.2.6] /* exists */ and certificate leaf[field.1.2.840.113635.100.6.1.13] /* exists */ and certificate leaf[subject.OU] = GP5P6H7RRF
Static Code Validation:
No
ISL Light Client
Application bundle islnetworkstart requests access when a session is established with ISL Light Client. Binary issc_daemon requests access when restart and resume functionality is in use (e.g. restart of the computer).
islnetworkstart
The type of identifier:
Bundle id
Bundle Id:
com.islonline.islnetworkstart.dmg
Code Requirement:
identifier "com.islonline.islnetworkstart.dmg" and anchor apple generic and certificate 1[field.1.2.840.113635.100.6.2.6] /* exists */ and certificate leaf[field.1.2.840.113635.100.6.1.13] /* exists */ and certificate leaf[subject.OU] = GP5P6H7RRF
Static Code Validation:
No
issc_daemon
The type of identifier:
Path
Path:
/Library/Application Support/ISL Online/ISSC Daemon/issc_daemon
Code Requirement:
identifier "com.islonline.isllight.issc_daemon" and anchor apple generic and certificate 1[field.1.2.840.113635.100.6.2.6] /* exists */ and certificate leaf[field.1.2.840.113635.100.6.1.13] /* exists */ and certificate leaf[subject.OU] = GP5P6H7RRF
Static Code Validation
No
We have prepared an MDM Configuration file which can be downloaded: MDMConfig.xml
Note: When using MDM solutions, you can use the Allow Authorization option for Accessibility and Full Disk Access TCC services. Screen recording TCC service can only be authorized using the option Allow Standard User to Approve, which means it still needs to be allowed manually by the user.