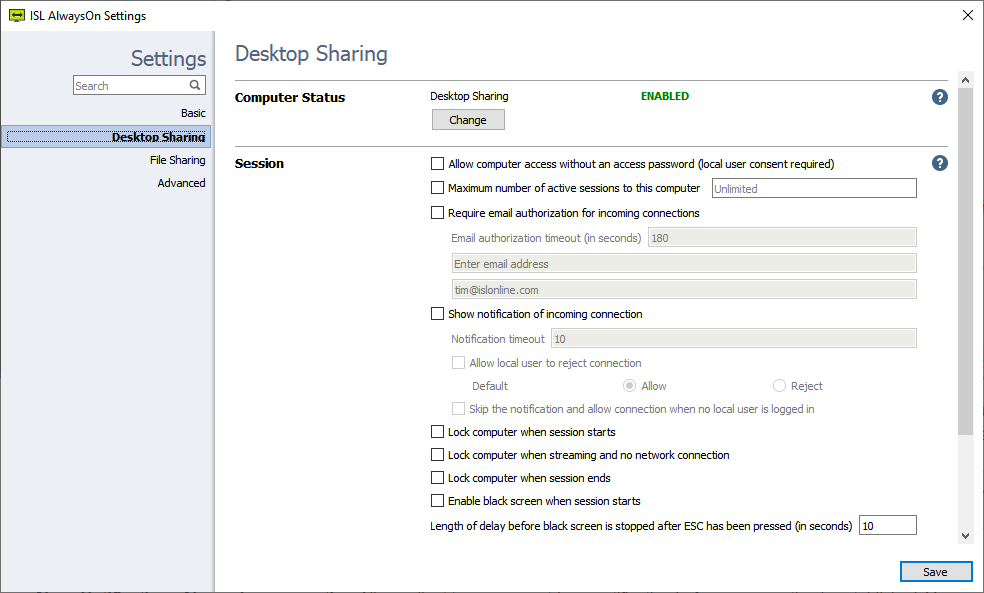
The desktop sharing options allow you to change a number of settings when running a session. The options are shown below:
-
Allow computer access without an access password (local user consent required): Allows the operator to connect to a remote computer without an access password. In this case, the local user has to approve the connection. To use this setting you have to use the next command line parameters when starting ISL Light:
ISLLight.exe --username "<isl_online_username>" --password "<password>" --connect-search "<computer_description>/<computer_name>" --consent-message "<message to be displayed>"
- Maximum number of active sessions to this computer: Allows to set the maximum number of active sessions to this computer. For example, to limit the access to one simultaneous connection to the computer use the value "1". The default is set to Unlimited.
-
Require email authorization for incoming connections: Enables the setting that email authorization is required for incoming connections.
- Email authorization timeout (in seconds): Customizable expiration time for authorization emails (default: 180 seconds).
- Recipient(s): Recipient(s) will receive an email providing an option to either approve or deny the connection. If multiple emails are set, authorization is required by any recipient. The connection will be authorized by the first recipient to approve, not necessarily by all recipients.
-
Show Notification of incoming connection: Allows client to see a countdown notification before a connection is established. You can specify the timeout and the options available to the local user.
- Notification timeout: Amount of time, in seconds, for which the notification is shown to the user before the connection is established.
-
Allow local user to reject connection: Allow the local user to reject the connection during the notification timeout. A prompt will be shown to the local user allowing them to reject the connection to their machine by the supporter.
-
Default: Specify the default action if the user does not select anything in the prompt shown to them and the
notification timeout runs out.
-
Default: Specify the default action if the user does not select anything in the prompt shown to them and the
- Skip the notification and allow connection when no local user is logged in: When this setting is selected the ISL AlwaysOn application will check if a local user is logged in. In that case, the notification dialogue will be shown. If a user is not logged in it will skip the showing of the notification and allow the supporter to connect.
- Lock computer when session starts: Lock the remote computer when the session starts, you will have to enter the account info to log in.
- Lock computer when streaming and no network connection: If the connection is interrupted while connected to the remote computer, the remote computer is automatically locked.
- Lock computer when session ends: Automatically lock the remote computer when the session ends.
- Lock computer when session starts: This will stop the user from being able to control the desktop when a session is in progress.
- Enable black screen when session starts: This means the local user cannot see the screen when the session is active.
- Length of delay before black screen is stopped after ESC has been pressed (in seconds): (Timeout in seconds after which the black screen is removed after ESC key is pressed on the remote side. The maximum time specified is 180 seconds.
The black screen is compatible with these operating systems on the streaming side:
- Windows 2000
- Windows XP
- Windows Vista
- Windows 7
- Windows 8 + 8.1 (Requires ISL AlwaysOn 2.2.4)
- Windows 10 (Requires ISL AlwaysOn 2.2.4)
- Windows 11 (Requires ISL AlwaysOn 2.2.4)
Examples:
Notification of Incoming Connection
Here is a demonstration of what you would expect to see when you check the box Show notification of incoming connection and set a Notification Timeout of 4 seconds.

- Start connection with client computer through ISL Light
- Type in the ISL AlwaysOn connection password for this computer
- The client will see the countdown timeout notification on their screen
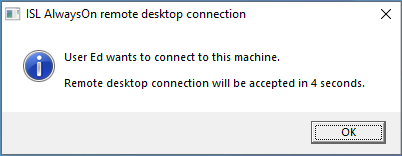
- Once the countdown is complete the connection to the client is established
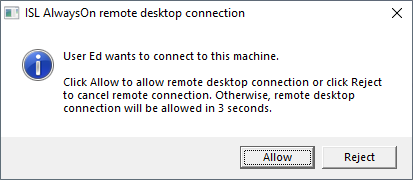
User Consent (default "Allow" after timeout)
Here is a demonstration of what you would expect to see when you check the box Allow local user to reject connection (with default Allow).

- Start connection with client computer through ISL Light
- Type in the ISL AlwaysOn connection password for this computer
- The client will be given the option to either Allow or Reject the supporter's connection
- If no button is pressed the connection will be automatically allowed after the set time has run out
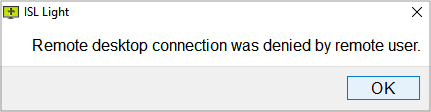
User Consent (default "Reject" after timeout)
Here is a demonstration of what you would expect to see when you check the box Allow local user to reject connection (with Reject).

- Start connection with client computer through ISL Light
- Type in the ISL AlwaysOn connection password for this computer
- The client will be given the option to either Allow or Reject the supporter's connection
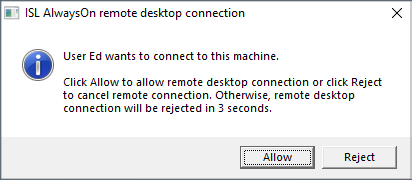
- If no button is pressed the connection will be rejected and the operator will see the following message:
Skip notification/consent
Here is a description of what you would expect to see when you check the box Skip the notification and allow connection when no local user is logged in.

- Start connection with client computer through ISL Light
- Type in the ISL AlwaysOn connection password
- Connection will now be made to the clients computer starting with the locked screen
User Consent (No Access Password)
Here is a demonstration of what you would expect to see when you check the box Allow computer access without an access password (local user consent required).

- Start connection with client computer through ISL Light using command line parameters
ISLLight.exe --username "ed@islonline.com" --password "pass1234" --connect-search "Work-PC" --consent-message "ACME Support here, please allow the connection"
- Connection starts automatically.
- The client will receive the pop-up notification.
- The session starts if the client clicks "Allow", otherwise it will be automatically rejected after the set time has passed.
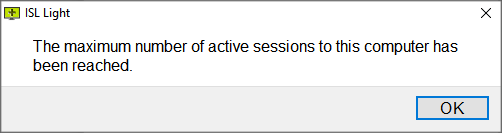
Maximum number of active sessions per computer
Here is a description of what you would expect to see when you check the box Maximum number of active sessions to this computer.

- Start connection with client computer through ISL Light
- Type in the ISL AlwaysOn connection password
- Connection will now be made to the client's computer
- Start another connection from a different computer to the same remote computer
- The operator will see this screen:
Enable Black Screen
Here is a demonstration of what you would expect to see when you check the box Enable black screen when session starts.

- Start connection with client computer through ISL Light
- Type in the ISL AlwaysOn connection password
- The connection will now be made to the client's computer
- The client's computer will turn black when the session starts showing this screen: