This topic provides a step by step guide on how to integrate a live chat to your webpage as seen on our homepage at islonline.com.
Note: All the files used in this guide are available for download here: Live_chat.zip
Step 1

Prepare the custom logo image that will be shown to your client during chat. Name it islpronto-logo.jpg and save it somewhere where it can be accessed from the internet (e.g. your server).
Note: To avoid image being displayed incorrectly it should not be bigger than 300x80 px.
Step 2

Log in with your ISL Online account at www.islonline.com. Open the "Users" tab and click "Configure Live Chat".
Step 3

Enter the image location from Step 1.
Step 4
<!DOCTYPE HTML>
<html>
<head>
<meta charset="UTF-8" />
<link type="text/css" rel="stylesheet" href="styles/styles.css">
</head>
<body>
Pronto live chat example.
<div id="chat" class="isl_chat">
<div class="bubble green" style="display:none;">
<span class="close-modal">☓</span>
<div>
    Hey, we’re BlueBike<br/>
    <small>Talk to us right here</small>
    <span class="figure-operator"></span>
    <a href="#" class="init-chat fill-parent"></a>
</div>
</div>
<!-- Specify a URL to open if there are no supporters online to chat with -->
<a href="http://www.islonline.com/company/leave-a-message.htm" class="button inactive init-chat" id="btn-chat" data-chat-text="<span>Chat with Us</span>">
<!-- Message that appears if there are no supporters online -->
<span>Leave a Message</span>
</a>
</div>
</body>
</html>
<script type="text/javascript">
/******************************************/
/* Edit these options to match your needs */
/******************************************/
/******************************************/
/*language - Set the language of chat interface that opens*/
/*domain - Set which domain should take the chat*/
/*chat width/height - Set dimensions of chat window that opens*/
/*server_adress - Set the address of your ISL Conference proxy server*/
/*filter - Set which dgroups inside the domain should take the call*/
/*protocol - http by default, you can set it to https if your ISL COnference Proxy is configured to support it*/
/******************************************/
var language = "en", domain = "bluebike", chat_width = "500", chat_height = "330", server_adress="islpronto.islonline.net", filter="", protocol="http";
</script>
<script src="https://ajax.googleapis.com/ajax/libs/jquery/1.12.0/jquery.min.js"></script>
<script src="scripts/isl_chat.js"></script>
Edit the code in the index.html file that was a part of the example zip. In our example we are setting the chat up for Tim who has an email tim@islonline.com and is the owner of bluebike domain.
Make the following changes:
<div> Hey, we’re BlueBike<br/> <small>Talk to us right here</small> <span class="figure-operator"></span> <a href="#" class="init-chat fill-parent"></a> </div>
Edit the text displayed on your webpage, e.g. enter your company's name instead of BlueBike.
var language = "en", domain = "bluebike", chat_width = "500", chat_height = "330", server_adress="islpronto.islonline.net", filter="", protocol="http";
Edit the domain parameter to the name of your domain and server_address to point to islpronto.islonline.net.
Step 5

Save the index.html file and access the webpage. If you have supporters online for the specified domain you should see the "Chat with us" button. Click on it to start chatting with available operator.
Step 6
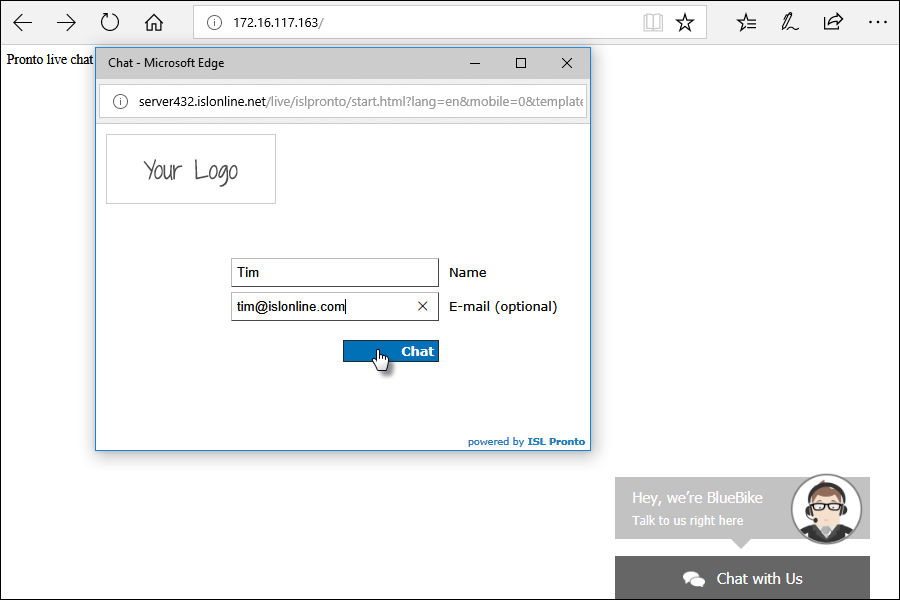
As a client enter your information and click "Chat" button to initiate the chat.